


6
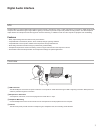
Listening Through Headphones
The headphone jack provides an equal blend of the direct microphone
signal and audio playback from the computer. This allows you to con-
veniently adjust the headphone volume for both with one control on the
MVi device touch panel. To adjust the amount of playback audio rela-
tive to the direct microphone signal, use the computer or DAW mixer
settings.
Tip: When first connecting the microphone to your computer, make
sure to raise the volume level in the sound control panel of the comput-
er for a strong audio signal. Then adjust headphone level for comfort-
able monitoring.
System Requirements and
Compatibility
Windows • Windows 7 and Windows 8
• Minimum RAM = 64 MB
• USB 2.0
Macintosh • OS X Lion 10.7, OS X Mountain Lion 10.8,
OS X Mavericks 10.9, OS X Yosemite
10.10
• Minimum RAM = 64 MB
• USB 2.0
iOS • iOS 8.0
• iOS 7.0
iPhone • iPhone 5
• iPhone 5c
• iPhone 5s
• iPhone 6
• iPhone 6 Plus
iPod Touch • 5th gen
iPad • iPad 4th gen
• iPad Air
• iPad Air 2
iPad Mini • iPad Mini 1st gen
• iPad Mini 2nd gen
• iPad Mini 3rd gen
Furnished Accessories
1 m USB cable AMV-USB
1 m Lightning cable AMV-LTG
Troubleshooting
Issue Solution
The display does
not illuminate
Make sure that the MVi is fully plugged in.
Audio is too low Check the computer sound control panel settings. When first connecting the MVi to
your computer, make sure to raise the computer volume level.
Audio sounds bad Check the sound control panel of the computer to ensure that the MVi is fully
plugged in and recognized.
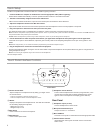
Audio is distorted Use the audio meter to ensure that volume peaks are within the target range. If
level is reaching the red peak indicator of the input meter, turn the gain down.
Audio sounds un-
natural or jittery
Make sure that the sample rate and bit depth microphone settings, found in the
sound control panel of the computer, are consistent with the sample rate and bit
depth selected in your software.
Device not work-
ing with USB hub.
The MVi requires 250 mA per port. Check USB hub documentation for current/port
specification.
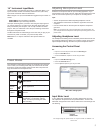
Sampling Rate and Bit Depth
Sample Rate and Bit Depth settings are found in a drop down menu
in the audio or sound control panel of your computer. You can adjust
these variables to fit your needs. Select a lower sample rate for podcast
recording, when it is important to have a smaller file for easy download.
Select a higher sample rate for music and more dynamic recordings.
Tip: Record at a higher sample rate and bounce down to an M4A for a
file with the highest sound quality at a manageable size.
Tip for PC users: Make sure that the sample rate and bit depth micro-
phone settings, found in the sound control panel of the computer, match
with the sample rate and bit depth selected in your software.