


4
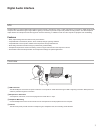
Quick Setup
The MVi is compatible with most devices that have a USB or Lightning connector.
1. Connect the MVi to a computer or mobile device. Use the appropriate cable (USB or Lightning).
Drivers will be installed automatically. The touch panel illuminates to indicate a successful connection.
2. The MVi is automatically assigned as the active audio device.
If MVi is not the selected audio device, open the sound control panel and select the Shure MVi driver.
3. Adjust the headphone volume on the MVi device driver.
Open the Shure MVi driver from the sound control panel and raise the headphone volume from the playback or output tab.
4. Plug a microphone or instrument into the input on the rear panel.
The XLR/TRS combo input is compatible with microphones, guitars, instruments, and other line-level sources.
Note: Condenser microphones require phantom power to operate. To turn on phantom power, press and hold the mute button for 3 seconds. The PH PWR LED on the
rear panel illuminates when phantom power is activated.
Caution: Never activate phantom power if using a ribbon microphone, as this may cause damage to the microphone.
5. Use the MODE button to select the preset mode that fits your application and adjust the microphone gain to suit the application.
If the audio is too quiet or causes distortion, adjust the gain manually. Refer to the "Adjusting Microphone Level" topic in this guide for more
details.
Note: When using the MVi, you can monitor and listen to playback through the device headphone output.
6. Plug in headphones to monitor the real-time audio and playback.
Pressing the headphone button changes to volume control slider to adjust the headphone volume (LEDs switch from green to orange when ad-
justing headphone volume).
Note: Do not use the gain adjustment to get more volume from the headphones.
You are ready to record.
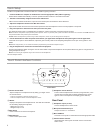
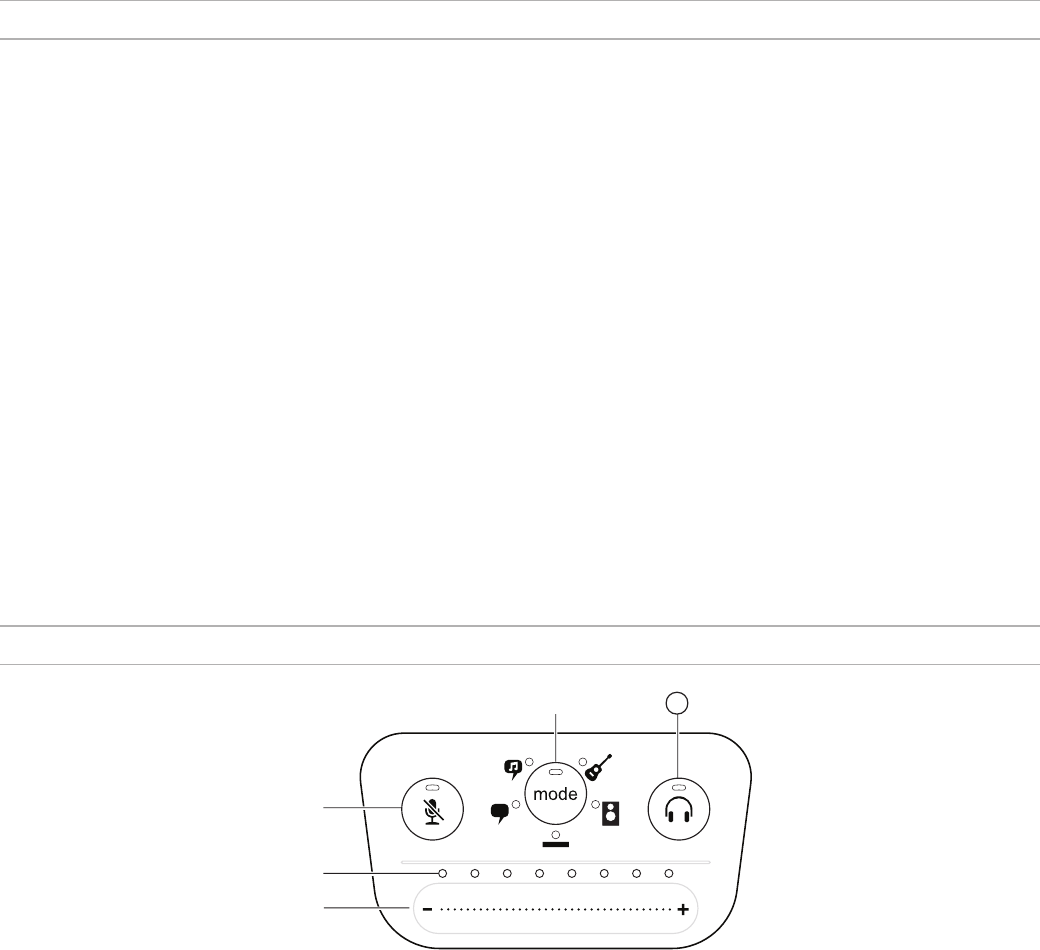
Touch Panel Interface Controls
5
Touch Panel
① Volume Control Slider
Adjust microphone or headphone level by sliding your finger across
the control surface.
- Press the mode button to activate microphone level.
- Press the headphone button to activate headphone volume.
② LED bar
Displays microphone and headphone level. The LED color indicates
the level being displayed or adjusted.
- Green: Microphone level
- Orange: Headphone level
③ Mute Button
Press to mute and unmute the microphone.
④ Mode Selector
Press to select preset mode.
⑤ Headphone Volume Selector
Press to select headphone level controls (orange LED bar). Then
use the volume control slider to adjust headphone level. Press
again to return to microphone level display (green LED bar).
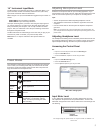
Rear Panel
① Headphone output (3.5 mm)
Connect headphones to monitor audio.
② Microphone/Instrument Input
Accepts an XLR or ¼" connection.
③ Micro-USB Port
Connects to a computer or mobile device with the appropriate cable.
④ Phantom Power Indicator
Illuminates when active (press and hold mute for 3 seconds to
switch on/off).