


3
USB Microphone
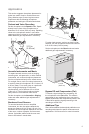
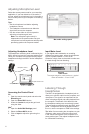
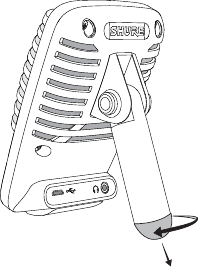
Mounting and Placement
Desktop
Aim the microphone towards the sound source
by adjusting the kickstand.
Microphone Stand
Unscrew the end cap to thread the kickstand
onto a standard 5/8" microphone stand.
Kickstand End Cap
Quick Setup
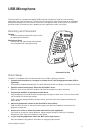
The MV51 is compatible with most devices that have a USB or Lightning connector.
1. Connect the microphone to a computer or mobile device. Use the appropriate cable (USB or
Lightning).
Drivers will be installed automatically. The touch panel illuminates to indicate a successful connection.
2. Open the sound control panel. Select the Shure MV51 driver.
Raise the level on both the MV51 product and the host computer for proper monitoring.
3. Confirm that the MV51 is the selected audio device.
Plug headphones into the MV51 device audio output and play an audio track. If you can hear sound,
the microphone is functioning properly.
If your computer settings default to another device, open the sound control panel and select the
MV51 device.
4. Adjust the headphone volume on the Shure MV51 device driver.
Open the MV51 driver from the sound control panel and raise the headphone volume from the
playback or output tab.
5. Use the MODE button to select the preset mode that fits your application.
If the audio is too quiet or causes distortion, adjust the gain manually. Refer to the "Adjusting
Microphone Level" topic in this guide for more details.
6. In your recording application, select the MV51 as the input source.
See your software user guide for information on assigning input sources.
You are ready to record.
The Shure MV51 is a professional-quality USB condenser microphone, ideal for home recording,
podcasting, and video conferencing. The attractive and durable all-metal design features an adjustable
kickstand for desktop use, and can also mount onto a microphone stand. A touch panel user interface
provides control of microphone gain, headphone level, application modes, and muting.