


10
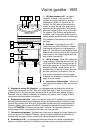
Setting Up and Using Your
VM1 System
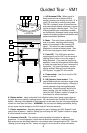
The basic procedure for setting up and using your VM1 Wireless System takes only a few
minutes:
1. For the VM1 system to work correctly, both the receiver and transmitter must be set to
the same channel. Remove all packing materials (save them in case of need for future
service) and check to make sure that the supplied VM1 receiver and VT3L or VH3
transmitter are set to the same channel. If these channels do not match, contact your
distributor or, if purchased in the United States, Samson Technical Support at
1-800-372-6766.
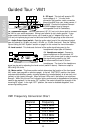
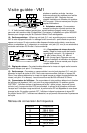
2a. If you are using a 9-volt battery to power the VM1, press gently down on the battery
door release (on the front of the VM1, on the word “Open”) and swing the door open in
order to access the battery compartment. Note that the door is hinged and is not
intended to be removed from the receiver case. Insert a 9-volt battery, being careful to
observe the polarity markings.
Warning: Reversing the battery polarity may cause
permanent damage to your receiver. Turn the power switch “On” and set the Meter
switch to “BATTERY.” All three Battery meter LEDs will light if the battery is sufficiently
strong. Once you’ve verified battery strength, turn the power switch “Off” again.
2b. If you are using the optional Samson AC300R adapter or your video camera’s 12-volt
power supply to power the VM1, connect it to the VM1 DC input jack. On the front of the
VM1, press gently down on the battery door release (on the word “Open”) and swing the
door open note that the door is hinged and is not intended to be removed from the
receiver case). Make sure the power switch is set to “Off.”
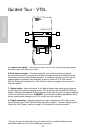
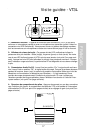
3a. If your system contains a VT3L belt-pack transmitter, locate the battery cover release
and slide the lever down to open the battery door, which is hinged and not intended to be
removed from the transmitter case. Please use care when opening this door as undue
force will destroy the hinge.
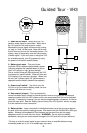
3b. If your system contains a VH3 handheld transmitter, unscrew the bottom section of
the microphone by turning it counterclockwise and then slide it off.
4. Place a fresh 9-volt alkaline battery in the transmitter battery holder, taking care to
observe the polarity markings. If you are using a VT3L belt-pack transmitter, gently
replace the battery door by swinging it up and pressing until it clicks. If you are using a
VH3 handheld transmitter, replace the bottom section of the microphone by sliding it on
and then screwing it back on. Whichever transmitter you are using, leave it off for the
moment.
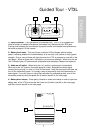
5. Next, make the physical cable connection between the unbalanced output of your VM1
receiver and the audio input of your video camera or audio amplifier or mixer, being
careful to set the Audio Output Level switch so that the signal is strong but not distorting.
Normally, it should be set to the “-30” position when connecting to a mic-level input and to
the “-20” or “-10” position when connecting to a line-level input. Leave your amplifier
(and/or mixer) off at this time.
6. Turn the power to the VM1 “On” and close the battery door.
7. Extend both “A” and “B” antennas from the VM1 and place both in a vertical position.
ENGLISH