


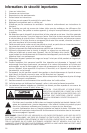

6
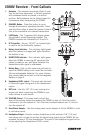
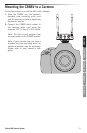
CR88V Receiver - Front Callouts
1. Antennas - The antenna mountings allow full rota-
tion for optimum placement. In normal operation,
both antennas should be placed in a vertical
position. Both antennas can be folded inward for
convenience when transporting the CR88V.
2. CHANNEL Button - Press this button to cycle
through the receiver’s operating channels. Press
and hold this button to send the channel informa-
tion to the transmitter via infrared transmission.
3. LED Display - The 7-segment LED display shows
the receiver’s current operating channel. The
CR88V channels are indicated by 0-9 and A-F.
4. IR Transmitter - During “IR SET” an infrared light
is used to set the transmitter channel.
5. Battery Level Indicator - This indicator lights green
when the battery is charged and ligths red when
the battery is low.
6. READY/PEAK Indicator - This indicator lights green
when the CR88V is receiving RF signal and the
system is ready to use, and lights red when the
transmitted audio signal is overloaded.
7. Battery Door - Push in both sides and pull back to
open the CB88V battery cover. Insert the included
lithium rechargeable batteries. For more informa-
tion, please read the section on the Rechargeable
Battery on page 9.
8. Headphone LEVEL control - This knob sets the level
of the audio signal being sent to the headphones
output.
9. OUT Jack - Use this 1/8” (3.5 mm) locking mini-
phone jack when connecting the CR88V to your
video camera or audio device.
10. VOL/PWR Control - This rotary knob controls the
level of the receiver output and powers the CR88V on and off. Turn the control
clockwise to turn the system on. Turn the knob counterclockwise until it clicks to
turn the system off.
11. Shoe Mount Adapter - Use this locking shoe mount adapter to fix the CR88V to a hot
or cold shoe mount.
12. Headphone Output - Connect a stereo headphone to this standard 1/8” (3.5 mm)
mini-phone jack in order to monitor the signal being output by the CR88V. We rec-
ommend the use of 30 ohm headphones. The level of the headphone signal can be
set by adjusting the Headphone LEVEL control.
2
3
4 5
6
1 1
7
12
8 9 10
11