


7. Temporarily place a Russound speaker into the cut-out to insure that
it fits properly. It’s okay if the hole is slightly off/larger by 1/8”, since
it will be covered by the speaker’s outside frame. Actual installation
will happen later, after you’ve routed the speaker wires.
8. Repeat steps 1 through 7 for the other speaker.
9. Now it’s time to drill the hole on the OTHER end -at the point where
the wires from the speakers will exit to the amplifier/receiver.
- Use the same 1-inch drill bit as before.
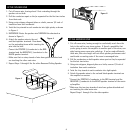
- If you want a custom look, install an outlet box against a stud and
cover it with a single outlet plate which has one hole in the middle
for the wires to exit from OR order from your Russound dealer a
Russound Stereo Pair Wall Plate Connector.
HOOKING UP YOUR SPEAKERS
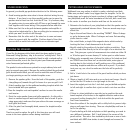
IDENTIFYING “+” AND “-”
You need to be able to discriminate between the two conductors of the
speaker wire. If your wire has transparent insulation, this is easy: one
conductor will be copper-colored and the other silver-colored.
Generally, professionals denote the copper one as POSITIVE (+) and the
silver one as NEGATIVE (-).
If you’ve used wire which has an opaque insulation, there are still differ-
entiating markings. Examine the wire closely and look for
1. A series of ribs or grooves on one conductor
2. A painted stripe or dotted line
- Denote any of these as the POSITIVE (+) conductor for similar con-
nections on both ends.
NOTE: It is important that you label your wires left and right
when you run them to eliminate future confusion.
5
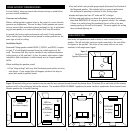
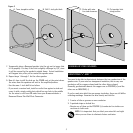
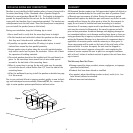
Figure 3
A. Trace template outline B. Drill 1-inch pilot hole
C. Probe with wire
for stud clearance
D. Cut speaker hole
along outline