


23
EXTERNAL REM IN
This 3.5 mm mini-jack (labeled EXT REM IN)
receives command codes from an industry-stan-
dard infrared receivers (Xantech, etc.) located
in the main listening room. This feature is useful
when the unit is installed in a cabinet and the
front-panel sensor is blocked. Consult your au-
thorized Rotel dealer for information on ex-
ternal receivers and the proper wiring of a jack
to fit the mini-jack receptacle.
NOTE
: The IR signals from the EXTERNAL RE-
MOTE IN jack (as well as those from the
ZONE REMOTE IN jack) can be relayed to
source components using external IR emitters
or hard-wired connections from the IR OUT
jacks. See the ZONE 2 section of this manual
for additional information.
Computer I/O
Keypad
The RSX-1065 can be operated with a per-
sonal computer running audio system control
software from third-party developers or with
a dedicated A/V control keypad from Rotel.
This control is accomplished by sending op-
erating codes (normally sent by the RR-969
remote control) from the computer or keypad
via a hard-wired network connection.
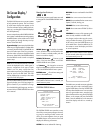
The COMPUTER I/O and KEYPAD inputs pro-
vides the necessary network connections on
the back panel. They accept standard RJ-45
8-pin modular plugs, such as those commonly
used in 10-BaseT UTP Ethernet cabling.
The COMPUTER I/O connector should be used
when controlling the RSX-1065 for the main
listening room. The KEYPAD connector should
be used to connect a keypad for controlling
the operations in ZONE 2. When using a
KEYPAD in ZONE 2, the function is identical
to that of an infrared repeater system connected
to the ZONE REMOTE IN jack. See the fol-
lowing section for detailed information.
For additional information on the connections,
software, and operating codes for computer
or keypad control of the RSX-1065, contact
your authorized Rotel dealer.
Zone 2 Connection and
Operation
The RSX-1065 provides Zone 2 multi-room
capability, allowing you to enjoy music and
operate the system from a second room. From
the remote location, you can select a source
component (even if different from the source
playing in the main listening room), adjust the
volume level in the remote zone, and oper-
ate the source components.
To use the Zone 2 capability, you need addi-
tional components: a pair of speakers installed
in the remote zone, an amplifier to drive them,
and a third-party IR repeater or keypad sys-
tem.
Zone 2 can be controlled from the main room
using RSX-1065’s front-panel ZONE button.
Operation from the remote zone requires the
installation of remote keypad compatible with
the back panel RJ-45 8-pin modular KEYPAD
connector or an infrared repeater system
(Xantech, Niles, etc.) which relays infrared
remote control commands from Zone 2 to the
ZONE REMOTE IN input on the back of the
RSX-1065.
Several points to keep in mind about the Zone
2 function:
• An infrared repeater system (Xantech, Niles,
et al) or remote keypad is required for op-
eration from the remote zone.
• There are two options for the Zone 2 out-
put level, selectable from the ON-SCREEN
DISPLAY menu system. VARIABLE output
gives you full adjustment of the volume level,
remembering last previous setting when-
ever Zone 2 is activated. FIXED output
disables the Zone 2 volume control with
the output permanently set to a specified
level. This might be useful for sending a
line level signal to a preamp or integrated
amp with its own volume control or to a
distribution amplifier with multiple
autoformer-type volume controls.
• The RR-969 remote control supplied with
the RSX-1065 will operate Zone 2 if used
with a repeater system from the remote
zone. It can also be programmed to op-
erate Rotel source components via the
RSX-1065's IR OUT jack.
• Any source component connected to the
RSX-1065's analog inputs (except the MULTI
input) can be sent to the Zone 2 outputs.
ZONE 2 operates independently of the
main room. You can select a different source
or adjust Zone 2 volume without affecting
the MAIN outputs in any way.
• Avoid sending the same infrared command
to the RSX-1065 front-panel sensor and a
Zone 2 repeater at the same time. This
means that Zone 2 must be in a different
room from the RSX-1065.
Zone 2 Power On/Off
Operation
Once master power is applied to the unit by
pressing the front-panel POWER button, the
RSX-1065 provides independent power on/
off operation for both zones. Pressing the re-
mote control POWER button in the main room
activates or deactivates the RSX-1065 in the
main room only and has no effect on Zone
2. Conversely, activating or deactivating Zone
2 has no effect on the main listening room.
However, placing the front-panel POWER but-
ton in the OFF position completely shuts off
the unit, for both zones.
NOTE
: For proper power on and off opera-
tion with Zone 2, the RSX-1065’s power mode
should be set to the factory default DIRECT
setting or to the STANDBY setting using the
OTHER OPTIONS menu from the ON-
SCREEN DISPLAY.
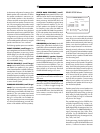
Controlling Zone 2
from the Main Room
ZONE Button
You can control Zone 2 from the front-panel
of the RSX-1065 – activate or deactivate Zone
2, change input sources, and adjust the vol-
ume. Controlling Zone 2 from the front-panel
is accomplished by pressing the ZONE but-
ton, which temporarily puts the RSX-1065 in
Zone 2 control mode, even if the unit is in
standby mode. When the ZONE button is
pressed, the FL DISPLAY shows the current status
of ZONE 2 for five seconds, during which time
you can use the VOLUME control and INPUT
SOURCE buttons to change the ZONE 2 set-
tings. When ZONE 2 is active, the ZONE
indicator appears in the left side of the FRONT
PANEL DISPLAY.
NOTE
: Zone 2 cannot be controlled from the
remote in the main room.
English