


8
RA-972 Stereo Integrated Amplifier
Route the wire from the RA-972 to the speak-
ers. Give yourself enough slack so you can
move the components to allow access to the
speaker connectors. If you are using dual
banana plugs, connect them to the wires and
then plug into the backs of the binding posts.
The thumbscrews of the binding posts should
be screwed in all the way (clockwise).
If you are using terminal lugs, connect them
to the wires. If you are attaching bare wires
directly to the binding posts, separate the wire
conductors and strip the insulation from the
end of each conductor. Be careful not to cut
into the wire strands. Unscrew (turn counter-
clockwise) the binding post thumbscrews. Place
the connector lug or wire around the bind-
ing post shaft. Turn the thumbscrews clock-
wise to clamp the connector lug or wire firmly
in place.
Note: Be sure there are no loose wire
strands that could touch adjacent wires or
connectors.
Phones Output
The Phones output allows you to connect head-
phones for private listening. This output ac-
commodates standard stereo phone (1/4”)
plugs. If your headphones have another type
of plug, such as a 1/8” mini-plug, you will
need an adapter plug. Contact your autho-
rized Rotel dealer, to get the correct adapter
plug. Plugging in a set of headphones does
not cut off the signal to the outputs. Use the
Speaker Selector to turn off the speakers. The
setting of the Listening Selector controls which
source is heard. Turn the front panel Listen-
ing Selector to the source you want to listen
to. Or press the corresponding source button
on the remote control.
Note: Because the sensitivity of speakers
and headphones can vary widely, always
reduce the volume level before connecting
or disconnecting headphones.
Audio Controls
Volume Control
Turn the controls clockwise to increase the vol-
ume, or counterclockwise to decrease the vol-
ume. Or use the remote control volume but-
tons. Press the
▲ button to increase the volume,
or the
▼ button to decrease the volume.
Tone On/Off Switch
When the Tone Switch is in the Off position
the Bass and Treble Control (Tone Control)
circuits are bypassed to ensure the purest pos-
sible sound. Leave the Tone Switch in the Off
position unless you want to use the Tone Con-
trols. Turn the Tone Switch to the On position
if you want to adjust the Tone Controls.
Bass and Treble Controls
When the Tone Switch is in the On position,
turning the Bass and Treble Controls adjusts
the tone balance of the sound. Turn the Con-
trols clockwise to increase the bass or treble
output. Turn the Controls counterclockwise to
decrease the bass or treble output.
A properly set up high-performance audio
system produces the most natural sound with
little or no adjustment of the tone controls. Use
these controls sparingly. Be particularly careful
when turning the controls up (clockwise). This
increases the power output in the bass or treble
range, increasing the load on the amplifier
and speakers.
Listening Selector
The setting of the Listening Selector controls
which of the input signals goes to the main
outputs and onto the power amplifier – or, more
simply, which source is heard. Turn the front
panel Listening Selector to the source you want
to listen to. Or press the corresponding source
button on the remote control.
Recording Selector
The setting of the Recording Selector controls
which of the input signals goes to the record
outputs. When you are not recording, set the
Recording Selector to the Off position to mini-
mize the chance of interference from other
components in the system.
Having a separate Recording and Listening
selector adds a significant degree of flexibil-
ity in how you can use the RA-972. For ex-
ample by setting the Record Selector to CD
and the Listening Selector to Tuner you could
record a CD onto a tape while listening to the
tuner.
There is no Tape 2 position on the Recording
Selector. Consequently, if you wish to dupli-
cate (“dub”) a recording from one recorder
to another, the source unit must be connected
to Tape 1 input. Set the Recording Selector
to Tape 1. Connect the unit recording the signal
to the Tape 2 output.
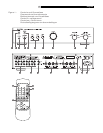
Remote Control Functions
Mute Control
To temporarily mute the sound of the system
press the Mute Button on the RR-AT92 remote.
The volume Control LED blinks when the sound
is muted. Press the button again to return the
sound volume to the original level.
Power On/Off
When the front panel Power switch is on, the
RA-972 can be put in Standby mode by press-
ing the Power button on the remote. The LEDs
in the Volume control and the Function selec-
tor will turn off. Press the Standby button again
to return the unit to normal operating mode.
NOTE: The RR-AT92 can be used to oper-
ate the basic function of other certain other
Rotel components, including Tuners, CD
Players and DVD Players.
To operate a Rotel Tuner —
1) Select the tuner function of the RR-AT92.
2) Press “Power” and “1” (RT-955) or “2”
(RT-940AX).
3) Press the key for Tuner operation.
To operate a Rotel CD Player —
Select the CD function of the RR-AT92
To operate a Rotel DVD Player —
Select the AUX 1 function of the RR-AT92.