


Replacing the Output Tubes
There are two possible reasons for replacing the tubes in your amplifier. Either the tubes supplied
with the amplifier have worn out, or you want to experiment with a different brand of tubes.
The tubes supplied with your amplifier will meet or exceed our minimum performance specifica-
tions, but “super premium” tubes might produce a subjective improvement in the sound produced by
the amplifier. All four output tubes should be the same brand, but it is not necessary to use premium
“matched sets,” because the on-board bias adjustment allows you to match any set of four tubes.
When you replace the output tubes, we recommend that you replace the input tubes at the same time.
The tubes supplied with your amplifier should operate for at least 10,000 hours. As a tube ages, the
plate current will drop, so it will become necessary to return the plate current back to 45 mA by
turning the bias control clockwise. If the bias setting is advanced clockwise significantly over the
original setting or that it can no longer be adjusted, it may be indication that you should replace the
tubes with a fresh set of vacuum tubes.
Red Rose Music can supply replacement matched tubes at a competitive price. You may order new
tubes from your dealer, or directly from Red Rose Music.
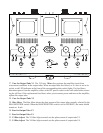
Follow these steps to replace the output tubes:
1. Turn off the amplifier.
2. Disconnect the power cord from the amplifier.
3. When they are cool to the touch, remove the old tubes.
4. Insert the new tubes into the sockets
5. Use a clean soft cotton cloth to wipe the glass parts of each tube.
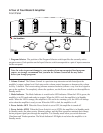
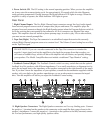
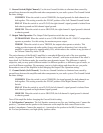
6. Move the BIAS MONITOR switch to V1.
7. Use a small screwdriver or an alignment tool to turn all four Bias Adjust controls counter-
clockwise all the way to the stop.
8. Connect the power cord and turn on the amplifier.
9. Wait five minutes for the tubes to warm up.
10. Turn the V1 Bias Adjust control clockwise to set the plate current to 45 mA.
11. Move the BIAS MONITOR switch to V2 and set the plate current to 45 mA
12. Repeat the process for the other two output tubes.
13. Recheck each tube and again after an hour.
After all four tubes are aligned, you should be able to move the BIAS MONITOR switch be-
tween V1 and V2, and between V3 and V4 with little or no obvious meter movement.
Safety Instructions
As with any sensitive electronic equipment, make sure that the Model 5’s location is out the reach of
small children or pets. Never place electronic equipment in a location that exposes it to potential
damage by foot traffic, food or liquids.
Never place the Model 5 in a location where items from a higher shelf could fall and damage the
Model 5. Never operate the Model 5 if it is visibly damaged. If the Model 5 inadvertantly becomes
damaged, disconnect from AC power at the wall outlet and let it sit for 5 minutes before touching it.
If you are unsure of the malfunction, please read the troubleshooting guide. Your dealer or agent
should also be contacted for their advice and service before reconnecting the Model 5 to AC power.