


10. Insert each of the output tubes into the socket with the number that matches the number
marked on the tube. Carefully align the key in the base of the tube to the keyway in the
socket. Take care to avoid damaging the positioning key on the base of each tube. If you did
not use the cotton gloves, wipe the glass part of each tube with a clean soft cotton cloth.
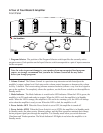
11. Install interconnect cables between the amplifier and your high-level program sources. All
five pairs of inputs are identical high-level analog channels. If you want to use the amplifier
with a turntable or other low-level program source, you must use an external preamplifier
stage. If you are using a digital program source, you must use an external digital-to-analog
converter. CD players have self contained digital-to-analog converters.
12. If you want to record music as you play it through the amplifier, install interconnect cables
between the amplifier’s TAPE OUT connectors and the recorder’s analog inputs.
13. Plug the power cord into the amplifier, and then into an AC power outlet. Do not use a
convenience outlet on another component; plug the power cord directly into a wall outlet, or
use a power conditioner or power strip.
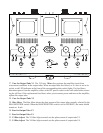
14. Turn the volume control down. Turn the Power switch to ON. When the tube filaments reach
their operating temperature, the AC mains power control circuit will automatically power up
to ON and change the LED indicator above the Volume Control from orange to green.
15. Red Rose Music has tested and adjusted the plate current settings of your amplifier before it
left the factory, and most Red Rose Music dealers put the amplifier through an additional
“burn-in” test before they sell it. Therefore, the bias settings for the four output tubes should
be very close to their correct values and should not require further adjustment. However, we
still recommend that your check the plate current adjustment for each output tube after
installing the amplifier.
With no audio program playing through the amplifier and after the amplifier has been run-
ning for about five minutes in ULTRALINEAR mode, use the BIAS MONITOR selector
switch to measure the plate current of each output tube. The plate current of each tube should
be 45 mA ±4mA. If the meter shows that a tube has a plate current out of that range, use the
Bias Adjust trim pot for that tube to increase or decrease the plate current. Move the BIAS
MONITOR switch to OPERATE when you are not measuring bias.
On a new installation, carefully monitor the bias monitor for signs of a malfunctioning
tube. A sharp increase in plate current over the 45 ~ 50 ma range should monitored. A tube
showing excessive plate current will require replacing it with a new tube. Your Model 5 has
been supplied with a spare output and input tube in the event a replacement becomes
necessary. Please review the section “Replacing the output tubes” for ultralinear biasing
information.
Note: You have been supplied eight RCA shorting plugs (4 per channel) to use in
unused source inputs. However, do not short the tape loop output RCA.