


10
Installation
11
Installation
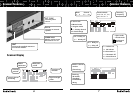
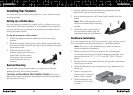
To remove your scanner from the
DIN sleeve, insert the two keys
straight into the scanner’s front
panel and pull the scanner out.
Connecting an Antenna
To connect an external antenna, follow the installation instructions
supplied with the antenna. Use 50-ohm coaxial cable, such as RG-
58 or RG-8X, to connect an outdoor antenna. For lengths between
50 and 100 feet, use RG-8X low-loss dielectric coaxial cable. For
lengths over 100 feet, use RG8. You also may need a BNC adapter
(not supplied).
Warning: Use extreme caution when installing or removing an
outdoor antenna. If the antenna starts to fall, let it go! It could
contact overhead power lines. If the antenna contacts a power
line, touching the antenna, mast, cable, or guy wires can cause
electrocution and death. Call the power company to remove the
antenna. DO NOT attempt to do so yourself.
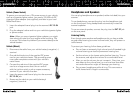
To attach the supplied antenna:
1. Align the antenna slots with
the tabs on the scanner, and
slide the antenna into place.
2. Turn and push in until the
antenna locks into place.
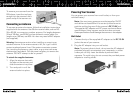
Powering Your Scanner
You can power your scanner from a wall outlet, or from your
vehicle’s battery.
Note: You must use a power source that supplies 12V DC
and delivers at least 600 mA. Its center tip must be set to
positive and its plug must fit the scanner’s DC 13.8V jack.
The supplied AC adapter and DC power cord meet these
specifications. Using a power source that does not meet
these specifications could damage the scanner or the adapter.
Wall Outlet
1. Connect the tip of the supplied AC adapter to the DC 13.8V
jack at the rear of your scanner.
2. Plug the AC adapter into your wall outlet.
Note: To prevent electric shock, do not use the AC adapter’s
polarized plug with an extension cord, receptacle, or outlet
unless you can fully insert the blades to prevent blade
exposure. To avoid injury, do not connect the provided power
adapter to a ceiling outlet.