


Polk Customer Service (800) 377-7655
6
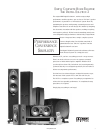
Carton Contents
Your new Polk Audio Digital Solution system comes in six (6) cartons.
If you do not have any of the pieces listed below, or if any component
seems damaged, contact your Polk Audio retailer immediately.
Carton 1:
One (1) Preamp/Processor
One (1) Infrared remote control
Two (2) AA batteries for remote
Three (3) 20' (6M) speaker cables
Two (2) 40' (12M) speaker cables
One (1) 4 Meter DB-25 interconnect cable
One (1) FM antenna wire
One (1) AM loop antenna
Carton 2:
One (1) DS-2 subwoofer with integrated 6 channel
power amplifier
One (1) IEC-type AC power cable
Cartons 3 & 4:
One (1) EACH, RT800i loudspeaker
Four (4) carpet spikes and four (4) rubber feet per speaker
Carton 5:
One pair (2) f/x500i loudspeakers
Eight (8) adhesive rubber pads
Two (2) wall mounting screws
Template for wall mounting
Carton 6:
One (1) CS400i Center Channel Speaker
Four (4) adhesive rubber feet
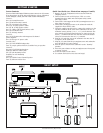
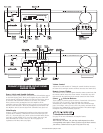
Quick Start Guide (see illustrations on pages 8 and 9)
1. Remove all of the components and accessories from the
shipping cartons.
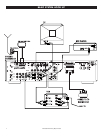
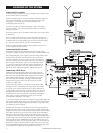
2. Connect sources such as DVD player, VCR, etc. to the
preamp/processor audio and video inputs using coaxial
(RCA-type) cables.
3. Connect the video output of the DS-2 preamp/processor to a
video input on your TV.
4. Connect the preamp/processor to the subwoofer with the
supplied 4 meter DB-25 cable.
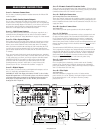
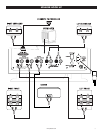
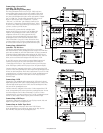
5. Using the supplied speaker wires, connect the speakers to the
speaker terminals on the back of the subwoofer. Be sure to
maintain correct polarity ( + to +, - to -) on all channels. The
wire with the black band should always be connected to the
black ( - ) terminal and the wire with the color band should
always be connected to the red ( + ) terminal.
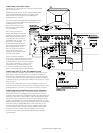
6. Plug the AC cord that was in the subwoofer box into the AC
receptacle on the subwoofer.
7. Plug the AC cords from the preamp/processor and subwoofer
into 120V/60 Hz AC power outlets.
8. Turn the power switch on the subwoofer to the “Standby”
position.
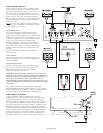
9. Press the power button on the preamp/processor front panel
or remote control.
10. Select the input of your choice.
11. Set volume and bass level to taste and enjoy!
GETTING STARTED
BASIC SETUP