www.polkaudio.com
16
On/Off Surround Button
This button switches between surround sound and 2 channel stereo.
IMPORTANT NOTE: The Dolby Digital (AC-3) mode can be selected
only when either LD, DSS Digital, or DVD inputs are selected. If you
have selected a digital source with a Dolby Digital soundtrack and you
cannot get the “3/2.1” indicator on the display (see page 23), the most
likely causes are:
1. The DVD player is not set to send out a 5.1 channel Dolby Digital
signal. In this case check the DVD player’s operation manual.
2. The 5.1 soundtrack has not been selected on the DVD disc. In this
case press the disc menu button on your DVD player to access the DVD
disc’s menu, and select Dolby Digital 5.1 on the disc’s set-up menu.
Consult your DVD player’s operation manual for more information.
3. The DVD disc does not have a 5.1 surround soundtrack. This is
especially true of pre-1985 movies.
Multi-Room Button
Pressing this button switches the multi-room mode on and off. See page
25 for more information on using this feature.
Tune Buttons
When either the AM or FM sources are selected, these buttons allow
you to manually tune AM and FM radio stations. Pressing the
button moves the tuner up the radio band. Pressing the button
moves the tuner down the radio band. The tuner stops as soon as you
release your finger from the button. See page 21 for more information
on using this feature.
Save Presets Button
When you want to select a radio station as a preset station, manually
tune to that station, press and hold this Save Presets button for 4 - 5
seconds. You will see the red MEMO light on the display flash. When
the MEMO light stops flashing, the radio station has been saved and
assigned the next available preset slot number. You may preset up to
30 AM and 30 FM radio stations. See page 22 for more information
on using this feature.
Clear Button
When you want to clear a radio station from the list of presets, select
that preset station, then press and hold the Clear button until CLEAR
appears on the display. See page 22 for more information on using
this feature.
Presets ▲▼ Buttons
These buttons select from the list of preset radio stations. Pushing the ▲
button moves from lower preset numbers to the higher preset numbers.
Pushing the ▼ button moves down through the list of preset stations.
Aux Inputs Jacks
These auxiliary video/audio input jacks are revealed by removing the
oval rubber cover. They accept the connection of a camcorder, portable
VCR, or any other temporary source. To make proper connections, refer
the owner’s manual of the auxiliary component.
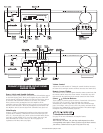
Radio Signal Strength Meter
This meter shows the relative signal strength of a radio signal. For best
reception, orient your antenna to get the maximum number of bars on
this meter.
Test Tone Indicator
This light illuminates when the surround sound balance test tone is
engaged. You should hear a “ssshhhhh” noise from one speaker when
this is on. See page 19 for more information.
Memory or Memo Indicator
This light illuminates when saving preset radio stations.
See page 22 for more information.
FM Auto Indicator
Shows that the tuner is prepared to receive a stereo FM broadcast.
Tuned Indicator
This lights when a radio station has been properly tuned in.
FM Stereo Indicator
Lights when a stereo FM broadcast is received.
Surround Mode Indicators
Indicates whether the system is delivering Stereo, Dolby Pro Logic, or
Dolby Digital sound. See page 23 for more information.
Digital Input Indicators
Indicates which digital audio input is selected and operating.
Late Night Indicator
Indicates that the late night compression circuit is engaged. See page
22 for more information on this function.
Preset Scan Indicator
Lights when the tuner is scanning through the radio station presets.
Multi-Room Indicator
Lights when the multi room function is engaged. See page 24 for
more information.
WHAT THOSE TEENY LITTLE LIGHTS MEAN


