


8
En
Before You Start
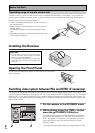
Installing the Receiver
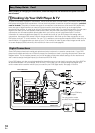
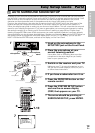
Opening the Front Panel
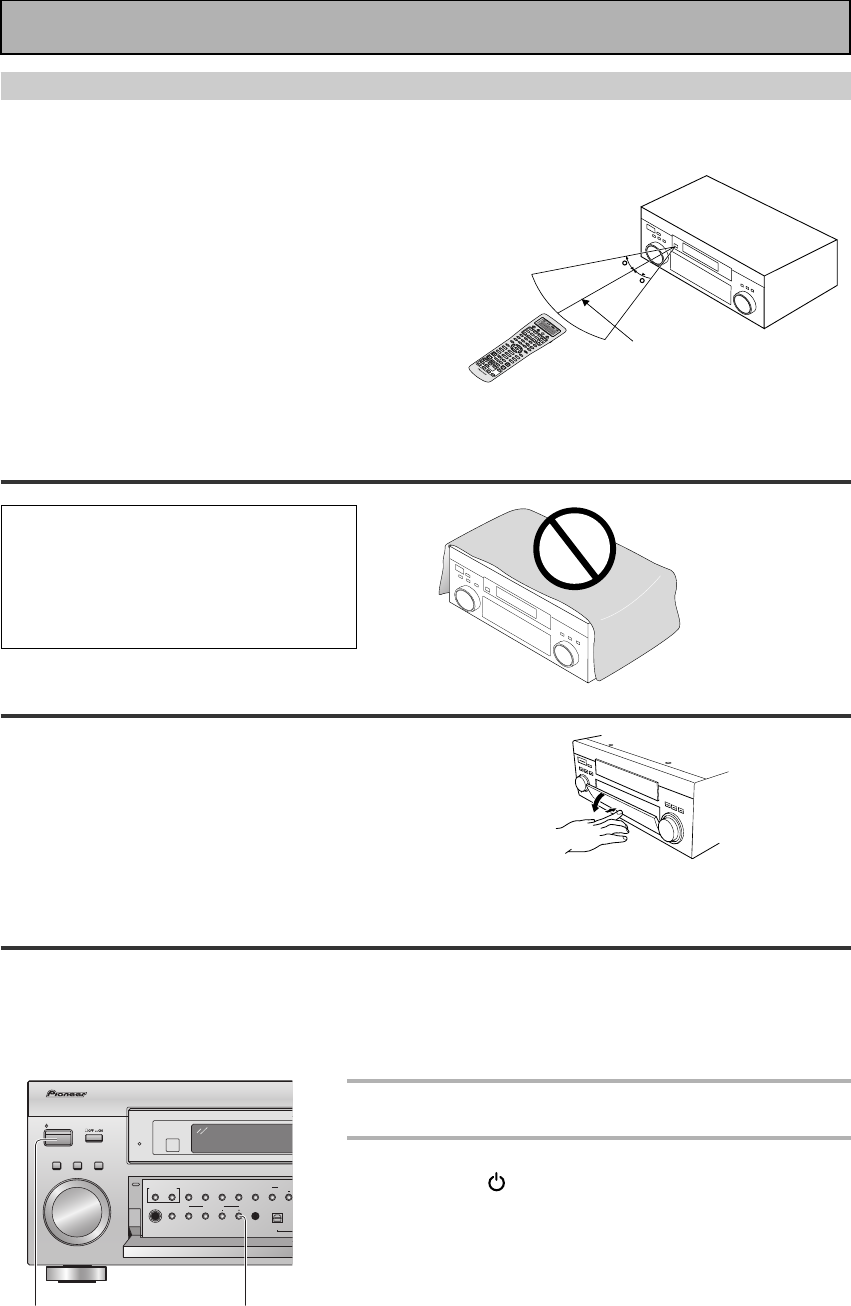
To open the front panel push gently on the lower third of the panel
with your finger.
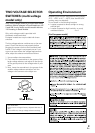
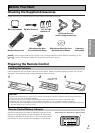
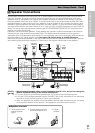
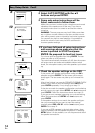
Operating range of remote control unit
The area in which you can use the remote control to operate the VSX-D2011 is fairly large. To use, point the
remote control toward the remote sensor on the front panel of this unit while within the range shown below.
Remote control may not function properly if:
• There are obstacles between the remote control and
the remote sensor.
• Direct sunlight or fluorescent light is shining onto the
remote sensor.
• The receiver located near a device emitting infrared
rays.
• Operated simultaneously with another remote control
which uses infrared rays.
OFF
A
V
P
R
E
-
P
R
O
G
R
A
M
M
E
D
A
N
D
L
E
A
R
N
I
N
G
R
E
M
O
T
E
C
O
N
T
R
O
L
U
N
I
T
A
X
D
7
2
9
0
S0
URC
E
Î
TV
MULTI
CON
T
R
OL
SYS
TEM
AMP
D
V
D
/
L
D
T
V
S
A
T
T
V
C
O
N
T
V
C
R
1
/
D
V
R
VCR
2
VIDE
O
M
U
L
T
I
O
P
E
R
A
T
I
O
N
CD
DIMMER
C
D
-
R
/
T
A
P
E
1
T
U
N
E
R
A
M
P
1
IN
P
UT
A
T
T
2
LOUDNESS
3
SPEAKER A/B
4
VI
D
EO
SE
L
5
SIGN
A
L
S
EL
6
T
AP
E
2
DI
RECT ACC
ES
S
D
I
S
P
M
ODE
–
+
+
1
0
D
I
S
C
7
EF
F
ECT
/
CH
SEL
L
8
T
O
N
E
9
B
A
S
S
/T
R
EB
L
E
1
0
1
1
1
2
0
SYST
E
M S
E
TU
P
M
E
N
U
REM
O
T
E
S
ET
U
P
STATUS
MPX
G
U
I
D
E
E
XI
T
R
E
T
U
R
N
E
N
T
E
R
TUNI
N
G
–
S
TAT
IO
N
S
U
R
R
O
U
N
D
L
I
S
T
E
N
I
N
G
M
O
D
E
–
CHA
N
NEL
–
1
4
RF A
TT
TUNING
+
+
CHANNE
L
+
¡
S
TAT
ION
¢
8
3
7
E
X
T
R
A
M
E
N
U
B
AN
D
CLAS
S
T
V
I
N
P
U
T
T
V
C
O
N
T
R
O
L
T
V
C
H
T
V
V
O
L
V
O
L
U
M
E
I
N
P
U
T
M
I
D
N
I
G
H
T
D
IG
I
T
A
L
N
R
S
T
E
R
E
O
/
D
I
R
E
C
T
T
H
X
M
U
T
E
S
T
AN
D
A
R
D
L
I
S
T
E
N
I
N
G
C
H
S
E
L
E
C
T
MU
LT
I
C
H
IN
PU
T
A
C
OUS
TIC
C
A
L
A
D
V
A
N
C
E
D
C
O
N
C
E
R
T
A
D
V
A
N
C
E
D
C
I
N
E
M
A
(
D
V
D
-A
/
S
A
C
D
)
L
I
G
H
T
S
E
T
U
P
30
30
7m
CAUTION!
• Do not cover this unit in any way, for exam-
ple with a sheet or piece of cloth. This would
prevent proper heat dispersal.
• Do not any place object directly on top of this
unit. This also would prevent proper heat
dispersal.
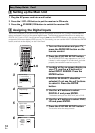
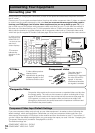
Switching video system between PAL and NTSC (if necessary)
This receiver is able to use two types of video systems for its OSD (on screen display) either PAL or NTSC. If
you don't match the system on the amplifier with your home system no OSD will appear on your TV. The default
setting is PAL. If you use this system you don't need to make any settings here. People with multi-system TVs
don’t need to worry about changing the setting either. If necessary, follow the instructions below to switch the
type of video system.
1 Put the receiver in the STANDBY mode.
2 While holding down the TONE + button
press the STANDBY/ON button.
The video system type will change depending on the state
the receiver was previously in. The new type, either PAL or
NTSC, will appear in the display. It will be shown for about
seven seconds and then the receiver returns to normal
operating mode.
To change the video system type again repeat steps 1 and 2.
22
STANDBY/ON
MOVIE MUSIC
MULTI JOG
ENTER
STANDBY
PHONES
SPEAKERS
SIGNAL
SELECT
SB CH
MODE
HI-BIT
HI-SAMPLING
SETUP
MIC
DIGITAL IN
SET UP RETURN
TONE
TONE CONTROL
BASS/TREBLE
CLASSBAND
STATION T
U
MULTI JOG CONTROL
SELECT