


101
EXPERT
Fine Tuning Your System
+
1. 5
dB
+
2. 5
dB
-
4. 0
dB
-
5. 5
dB
+
0. 5
dB
+
0. 0
dB
[]
[]
[]
[]
[]
[]
63Hz
125Hz
250Hz
4 kHz
11.3 kHz
TRIM
[
Exit
]
Center EQ
3
Front
EQ
Center
EQ
Front
EQ
Surround
EQ
SurrBack
EQ
SurrBack
EQ
Surround
EQ
[ ]
[ ]
[ ]
[ ]
[ ]
[ ]
[ ]
[
Exit
]
ALL CH ADJUST
R
L
R
L
R
L
4
+
2. 0
dB
+
2. 5
dB
-
4. 0
dB
-
5. 5
dB
+
0. 5
dB
+
0. 0
dB
[]
[]
[]
[]
[]
[]
63Hz
125Hz
250Hz
4 kHz
11.3 kHz
TRIM
[
Exit
]
Center EQ
5
1
ALL CH ADJUST
FRONT ALIGN
[ ]
[ ]
[
Exit
]
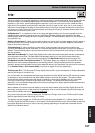
Acoustic Cal EQ
2
CUSTOM1 ADJUST
CUSTOM2 ADJUST
DATA COPY
DATA CHECK
[ ]
[ ]
[ ]
[ ]
[
Exit
]
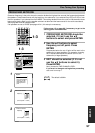
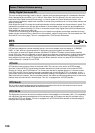
Acoustic Cal EQ
This explanation is for CUSTOM 1 or CUSTOM 2.
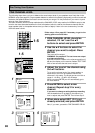
1
The four possibilities should be on the
OSD. Use the 5∞ buttons to select
CUSTOM 1 or CUSTOM 2. Press ENTER.
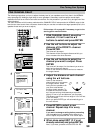
2
Use the 5∞ buttons to select ALL CH
ADJUST or FRONT ALIGN and press
ENTER.
The test tones will sound.
WARNING: the test tones are very loud!! Make sure
there are no infants or small children in the room and that
no one who will be scared, upset or damaged by loud noise
is present. You yourself may want to wear earplugs.
Here the terms ALL CH ADJUST and FRONT ALIGN
represent two types of equalizer methods that emphasize
different characteristics of the sound.
ALL CH ADJUST: In this method all the speakers (except
for the subwoofer) are independent. The settings that
were input when you did the AUTO SURROUND SETUP
(see pages 13–15) will be present but you can adjust
each speaker individually to suit your taste. The test
tones for each channel will sound individually.
FRONT ALIGN: In this method all speakers (except for
the subwoofer) are set in accordance with the settings
of the FRONT speakers. The settings that were input
when you did the AUTO SURROUND SETUP (see
pages 13-15) will be present but you can adjust each
speaker individually to suit your taste. This setting
allows the listener to enjoy a sound balance defined by
the front speakers. The front left speaker will serve as
the reference tone. The front left tone and the target
speaker (the one you are trying to adjust) will sound in
turns, so you can judge which needs to be louder.
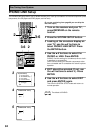
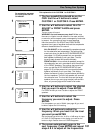
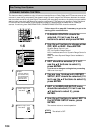
3
Use the 5∞ buttons to select the channel
that you want to adjust. Press ENTER.
For FRONT ALIGN you won't be able to adjust the FRONT
speakers.
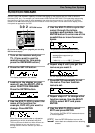
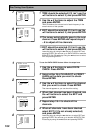
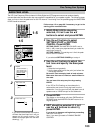
4
Use the 5∞ buttons to select the
frequency you want to adjust. Press
ENTER.
For the speakers you set to SMALL (see page 40) you won't
be able to adjust the 63 Hz setting.
5
Use the 5∞ buttons to adjust the
frequency. When you have it at the level
you want press ENTER.
Set the frequencies within the –6 dB to +6 dB range in steps
of 0.5 dB. If OVER appears in the display you have set the
levels too high. Reduce them until OVER disappears.
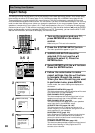
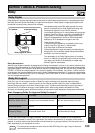
6
The cursor automatically goes to the
next frequency. Press ENTER and repeat
steps 4 & 5 to adjust all the frequencies.
For explanation purposes
the illustrations use ALL
CH ADJUST.