


3
Chapter
3
23
Basic Setup
Automatically setting up for surround sound
(MCACC)
The Auto Multi-Channel Acoustic Calibration (MCACC) setup
measures the acoustic characteristics of your listening area,
taking into account ambient noise, speaker size and distance,
and tests for both channel delay and channel level. After you
have set up the microphone provided with your system, the
receiver uses the information from a series of test tones to
optimize the speaker settings and equalization for your
particular room.
CAUTION
•
The test tones used in the Auto MCACC setup are output at
high volume.
Important
•
The OSD will not appear if you have connected using the
composite output to your TV. Use HDMI connection for
Auto MCACC setup.
•
The Auto MCACC setup will overwrite any existing speaker
settings you’ve made.
•
Before using the Auto MCACC setup, the NETRADIO,
PANDORA, M.SERVER, FAVORITE, iPod/USB or
ADAPTER input should not be selected as an input source.
•
When both the surround back speaker and the front height
speaker are connected, conduct Auto MCACC setup twice:
once with the Speaker System setting is in Surr.Back and
once with the Speaker System setting is in Height. (There
is no need to conduct Auto MCACC setup every time the
Speaker System setting is changed.)
1
Switch on the receiver and your TV.
2
Switch the TV input to the input that connects this
receiver to the TV through the corresponding HDMI
cable.
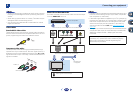
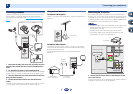
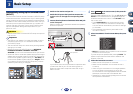
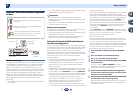
3
Connect the microphone to the MCACC SETUP MIC jack
on the front panel.
Make sure there are no obstacles between the speakers
and the microphone.
If you have a tripod, use it to place the microphone so that
it’s about ear level at your normal listening position.
Otherwise, place the microphone at ear level using a
table or a chair.
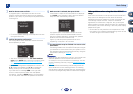
4
Press on the remote control, then press the
HOME MENU
button.
The Home Menu appears on your TV. Use
///
and
ENTER
on the remote control to navigate through the
screens and select menu items. Press
RETURN
to exit
the current menu.
•
Press
HOME MENU
at any time to exit the Home
Menu. If you cancel the Auto MCACC setup at any
time, the receiver automatically exits and no settings
will be made.
•
The screensaver automatically starts after three
minutes of inactivity.
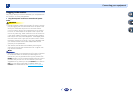
5
Select ‘Auto MCACC’ from the Home Menu, then press
ENTER
.
•
Mic In! blinks when the microphone is not connected
to MCACC SETUP MIC jack.
Try to be as quiet as possible after pressing
ENTER
. The
system outputs a series of test tones to establish the
ambient noise level.
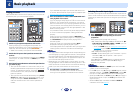
6
Follow the instructions on-screen.
•
Make sure the microphone is connected.
•
Make sure the subwoofer is on and the volume is
turned up.
•
When using surround back or front height speakers,
turn on the power to the amplifier to which the
surround back or front height speakers are connected,
and adjust the sound level to the desired level.
•
See below for notes regarding background noise and
other possible interference.
MASTER
VOLUME
iPod iPhone iPad
DIRECT CONTROL
SOUND
RETRIEVER AIR
ADVANCED
SURROUND
MCACC
SETUP
MIC
VIDEO
BAND TUNER EDIT TUNE PRESET ENTER
HDMI
iPod iPhone iPad
iPod
iPhone
iPad
ALC/
STANDARD SURR
T
O SURROUND
/
R
EAM DIRECT
USB
CONTROL ON
/
OFF
VSX
-42
Tripod
Microphone
RECEIVER
Home Menu
1
. Auto MCACC
2
. Manual SP Setup
3
. Input Assign
4
. Speaker System
5
. Video Parameter
6
. HDMI Setup
7
. Auto Power Down
8
. Network Standby
9
. ZONE2 Setup
10
. 12V Trigger