


Other connections
08
41
En
• You can press
DISP
to change XM Radio information
in the front panel display.
• The currently selected channel is automatically
chosen (without pressing
ENTER
) after 5 seconds.
Using XM HD Surround
XM HD Surround uses Neural Surround™ technology to
achieve optimal surround sound from XM radio.
• While listening to XM Radio, press AUTO SURR
for XM HD Surround listening.
See
About Neural Surround™
below for more on this.
About Neural Surround™
Neural Surround™ represents the latest advancement in
surround technology and has been adopted by XM
Satellite Radio for digital radio broadcasts of surround
recordings and live events.
Neural Surround™ employs psychoacoustic frequency
domain processing which allows delivery of a more
detailed sound stage with superior localization of
surround elements. System playback is scalable from
stereo up to state-of-the-art multichannel surround.
Neural Surround™ is trademark owned by Neural Audio
Corporation.
Saving channel presets
This receiver can memorize up to 30 channels, stored in
three banks, or classes, (A, B and C) of 10 stations each.
1 Select the channel you want to memorize.
See
Selecting channels and browsing by genre
above.
2 Press
T.EDIT
.
The display shows a blinking memory class.
3 Press CLASS to select one of the three classes then
press
/
to select the channel preset you want.
You can also use the number buttons to select a preset.
• The default for all presets is
XM001
.
4 Press
ENTER
.
After pressing
ENTER
, the preset class and number stop
blinking and the receiver stores the XM channel.
Listening to channel presets
You will need to have some presets stored to do this.
1 Press CLASS to select the class in which the channel
is stored.
Press repeatedly to cycle through classes A, B and C.
2 Press
/
to select the channel preset you want.
• You can also use the number buttons on the remote
control to recall the channel preset.
Connect & Play™, XM-Ready
®
and The Ultimate Playlist are
trademarks of XM Satellite Radio Inc. ©2005 XM Satellite
Radio Inc. All rights reserved. All other trademarks are the
property of their respective owners.
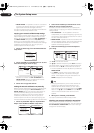
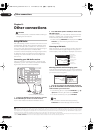
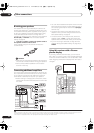
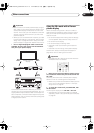
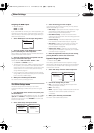
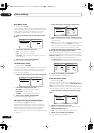
Connecting using HDMI
If you have a HDMI or DVI (with HDCP) equipped compo-
nent, you can connect it to this receiver using a commer-
cially available HDMI cable.
The HDMI connection transfers uncompressed digital
video, as well as almost every kind of digital audio that the
connected component is compatible with, including
DVD-Video, DVD-Audio (see below for limitations), Video
CD/Super VCD, CD and MP3.
1 Use an HDMI cable to connect the HDMI IN 1/2
interconnect on this receiver to an HDMI output on your
HDMI component.
HDMI
appears on the front panel when an HDMI-
equipped component is connected.
2 Use an HDMI cable to connect the HDMI OUT
interconnect on this receiver to an HDMI interconnect
on a HDMI-compatible monitor.
• The arrow on the cable connector body should be
facing right for correct alignment with the connector
on the player.
CD
IN IN IN IN INOUT OUT OUT
IN IN INOUT OUT
CD-R/TAPE/MD DVD/LD
DVR/VCR1 DVR
/
TV/SAT
CONTROL
AUDIO
ANTENNA
AM
L
Y
P
B
P
R
Y
P
B
P
R
Y
P
B
P
R
Y
P
B
P
R
DIGITAL
ASSIGNABLE
OPTICAL
COAXIAL
VIDEO
S-VIDEO
COMPONENT VIDEO
OUT
HDMI
XM
ASSIG-
NABLE
OUT
(
TV/SAT
)
(
CD
)
(
DVR/
VCR1
)
IN
IN 1
IN 2
OUT
IN
1
IN
1
IN
2
IN
3
(
DVD/LD
)
IN
1
(
DVR/VCR2
)
IN
2
IN
2
IN
3
31
R
L
R
L
OUT
IN
21
ASSIGNABLE
31
HDMI OUT
HDMI IN
HDMI/DVI-equipped component
HDMI/DVI-compatible monitor
or plasma display
VSX-1016TXV
DIGITAL OUT
AUDIO OUT
AUDIO RL
VSX-1016TXV_KU.book.fm 41 ページ 2006年3月24日 金曜日 午後9時19分