


6
TIPS ON CASSETTE TAPES
Do not use tapes longer than 90 minutes in length
Because over the C-90 tapes are very thin, they
can easily jam in the pinch rollers and capstan,
and they often are subject to other problems such
as irregular winding.
÷ Leader tape (which cannot be recorded on) is pro-
vided at the beginning of a cassette tape. Let the
tape run for about 5 seconds before starting to
record, to allow the leader tape to clear the record-
ing head.
÷ Do not leave a cassette tape exposed to the envi-
ronment. Store the cassette in its case after use
so that dust and dirt do not adhere to the tape,
and so the tape will not get slack. Store tapes in a
location free from magnetism, dust, dirt, oil, heat
and humidity.
÷ If cassette tapes are irregularly wound, the tape
may get jammed in the rollers. This can cause
damage to both the tape and the deck. If you are
not certain whether the tape is wound evenly, fast
forward or rewind the tape from beginning to
end, to make sure that the tape is properly
wound.
HANDLING CASSETTE TAPES
AUTOMATIC TAPE SELECTOR FUNCTION
This cassette deck is equipped with an automatic
tape selector function which utilizes the sensor holes
on the tape cassette to determine the type of tape
being used. The deck is then set to match the tape
recording bias and equalization.
NOTES:
÷
When using TYPE IV (Metal) tapes, make sure that
the tapes have sensor holes.
÷
Make sure that the sensor holes on the cassette are
not blocked; otherwise the tape selector mechanism
will not function properly.
÷
Do not use TYPE III (FeCr) tapes.
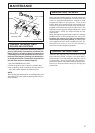
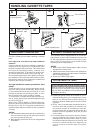
CHECK CASSETTE BEFORE USE
Check the following items before loading a cassette
tape:
Is the tape loose, or is some of the tape outside the
cassette?
If some of the tape is loose or projecting outside the
cassette shell, the tape may not load properly be-
tween the capstan and pinch roller. This will prevent
the tape from operating properly, and may even
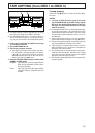
damage the tape itself. To prevent this, insert a pen-
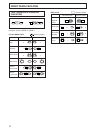
cil into the reel hole and take up the slack (Fig. A).
Some cassette tapes come with a plastic or thick pa-
per stopper to prevent the tape from becoming slack.
Remove this stopper when loading the cassette and
replace it after using the cassette.
Are the accidental erasure prevention tabs
intact?
These tabs allow you to prevent important record-
ings from being erased accidentally. When the tab
on the cassette shell is broken off (Fig. B), it is not
possible to activate the recording function, so valu-
able recordings will not be erased by mistake.
To rerecord on a cassette whose tab has been bro-
ken off, simply stick a piece of doubled adhesive tape
over the hole (Fig. C).
When using TYPE IV (Metal) or TYPE II (High/CrO2)
tapes, be careful not to block the sensor holes with
the tape (Fig. D, Fig. E). If the holes are blocked, the
automatic tape selector mechanism will not operate
correctly.
NOTES:
÷
The accidental erasure prevention tab for each side is
the one located on the top left when the side that
you want to protect is facing you.
÷
When breaking off the tab, do not use a magnetized
screwdriver.
C
E
D
A
For erasure prevention remove
Cover prevention
adhesive tape
Turn the pencil to take
up the tape slack
Tab for Side B
Tab for Side A
TYPE II (High/CrO2) tape
Sensor holes
Erasure prevention tabs
TYPE IV (Metal) tape
B
Sensor holes