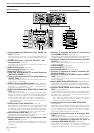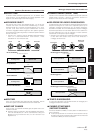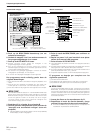
18 <DRB1255>
En/Fr
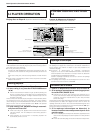
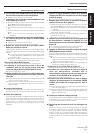
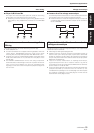
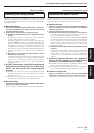
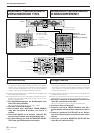
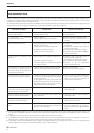
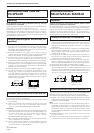
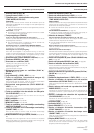
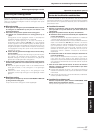
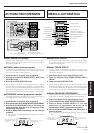
CUE
REV FWD
SEARCH
PLAY/PAUSE
EJECT
TRACK SEARCH
LOOP
OUT EXIT RELOOP
TIME MODE TEMPO
MT
MASTER
TEMPO
0
–6/–10/–16
AUTO CUE
IN/REALTIME CUE
6
0
4¢
1¡
AUTO MIX PLAY
BPM SYNC
SHORT TIME
AB
TRACKDISC PROGRAM
PLAY MODE SELECT
CLEAR
PLAYER SELECT
BPM/TRACK
PUSH ENTER
BPM/TRACK
SHORT TIME CHANGE MIX TIME
INSTANT
CHANGE
MIX MODE SELECT
BPM
NEXT
MINMAX
TRACK
LOOP
TEMPO
BPM
1765432
131211109
171819201615
148
REMAIN
MSF
16
10
6
A.CUE
RELOOP
A¥B AUDIO-OUT SELECT
POWER
MONITOR
MIN MAX
PHONES
A¥B A¥B/
AUTO MIX
PLAYER SELECT
AB
EJECT
DISC
A PLAYER
'
0
OUT ADJUST
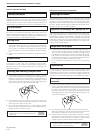
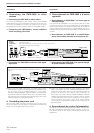
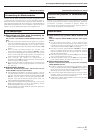
Saut de plages
7 Saut de plages à l’aide des touches TRACK
SEARCH (4, ¢)
Appuyez sur la touche TRACK SEARCH (4, ¢) avant ou
arrière.
¶ A chaque appui de la touche, le lecteur passe à la plage suivante,
dans la direction spécifiée. (Pour revenir à la plage qui précède
celle en cours de lecture, appuyez à deux reprises sur la touche
TRACK SEARCH (4) arrière.)
¶ Quand vous appuyez sur la touche TRACK SEARCH (4, ¢)
avant ou arrière et que vous la maintenez enfoncée, plusieurs
plages sont sautées successivement. En maintenant la touche
enfoncée pendant deux secondes ou davantage, vous augmentez
la vitesse de saut avant/arrière.
¶ Si vous appuyez sur la touche de recherche de plage arrière (4)
au début de la première plage du disque, le lecteur passe à la
dernière plage.
¶ Si vous appuyez sur la touche de recherche de plage avant (¢ ) à
partir de la dernière plage, le lecteur passe à la première plage
(c’est-à-dire la plage qui porte le numéro 1).
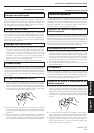
7 Recherche de plages ultra-rapide
Tournez le Jog Dial pendant que vous appuyez sur la touche
TRACK SEARCH (4, ¢) avant ou arrière.
¶ Si vous tournez le Jog Dial dans la direction dans laquelle vous
souhaitez sauter des plages pendant que vous appuyez sur la
touche TRACK SEARCH (4, ¢) avant ou arrière, le lecteur
passe en mode de saut ultra-rapide et adapte la vitesse au degré
de rotation du Jog Dial.
¶ La direction du saut des plages est identique à celle de la rotation
du Jog Dial. La direction indiquée par la touche TRACK SEARCH
effectivement enfoncée n’est pas prise en compte.
¶ Le lecteur quitte le mode de saut ultra-rapide dès que vous
relâchez la touche TRACK SEARCH.
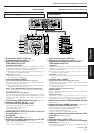
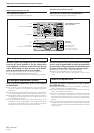
DJ player operation
Utilisation du lecteur DJ
Basic Operation/Fonctionnement de base
Skipping tracks
7 Skipping tracks using the TRACK SEARCH button
(4, ¢)
Press the forward or reverse TRACK SEARCH button (4, ¢).
¶ Each time the button is pressed, the player will skip to the next
track in the specified direction. (To skip to the previous track while
a track is being played, press the reverse TRACK SEARCH button
(4 ) two times in succession.)
¶ Pressing the forward or reverse TRACK SEARCH button (4,
¢) and holding down on the button will cause multiple tracks to
be skipped in succession. Holding down the button for two
seconds or more will cause the forward/reverse skipping speed
to increase.
¶ Pressing the reverse skip button (4) at the beginning of the first
track will cause the player to skip to the final track.
¶ Pressing the forward skip button (¢) from the last track will
cause the player to skip to the first track (i.e., Track No. 1).
7 Super-fast track searching
Turn the jog dial while pressing either TRACK SEARCH button
(4, ¢).
¶ Turning the jog dial in the direction you wish to skip while
pressing the forward or reverse TRACK SEARCH button (4,
¢) will cause the player to enter high-speed skipping mode,
with the speed being adjusted in accordance with the degree to
which the jog dial is turned.
¶ Tracks will be skipped in the same direction as that in which the
jog dial is rotated. The direction indicated by the TRACK SEARCH
button actually pressed will be ignored.
¶ Releasing the TRACK SEARCH button causes the player to leave
high-speed skipping mode.
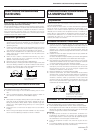
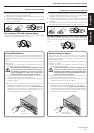
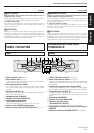
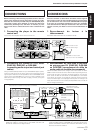
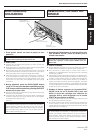
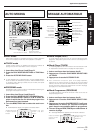
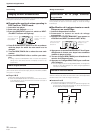
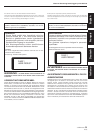
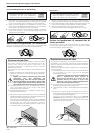
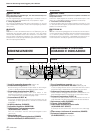
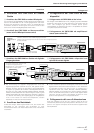
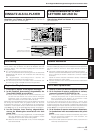
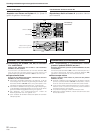
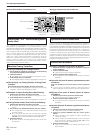
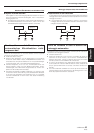
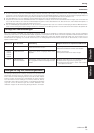
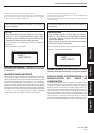
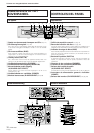
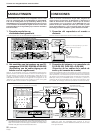
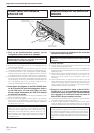
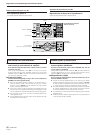
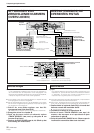
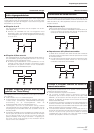
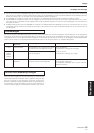
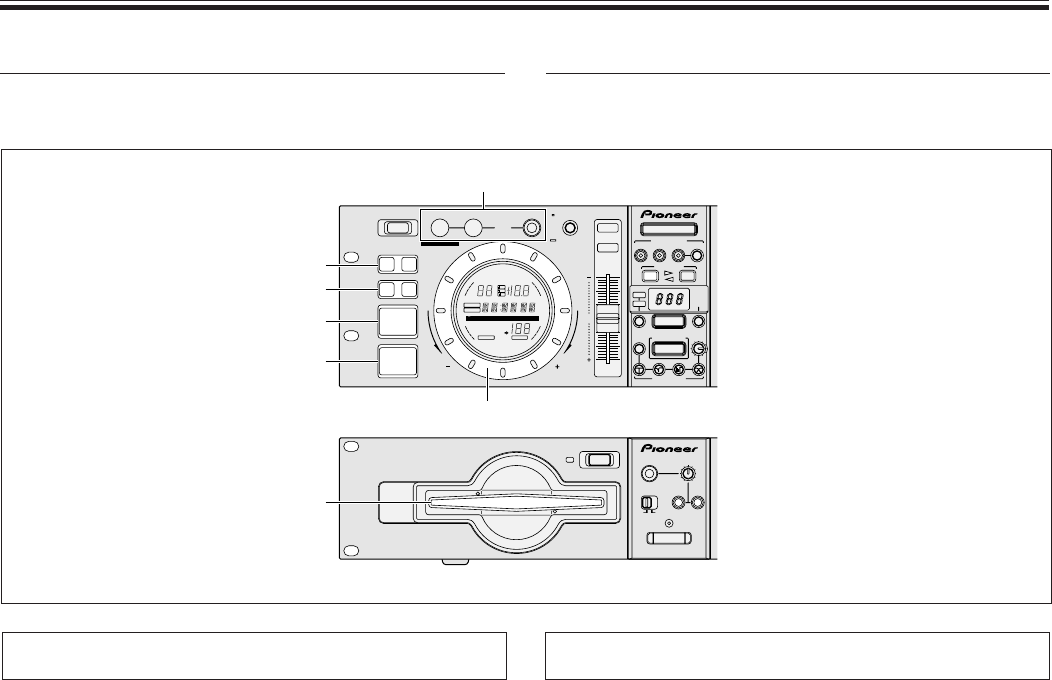
Remote control unit
Télécommande
Player
Lecteur
CUE
Disc insertion slot
Fente d’insertion du disque
PLAY/PAUSE
Jog dial/Jog dial
SEARCH (1, ¡)
TRACK SEARCH (4, ¢)
LOOP
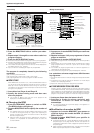
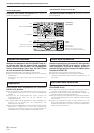
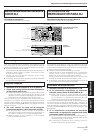
Playing discs on Player A (Operation identical for Player B) Lecture de disques sur le lecteur A
(fonctionnement identique pour le lecteur B)