16 <DRB1255>
En/Fr
DJ PLAYER OPERATION
UTILISATION DU LECTEUR
DJ
Auto cueing
Auto cueing is used to automatically specify the cueing point (see p. 19)
to be used before sound actually begins to play when inserting a disc or
when performing track searching.
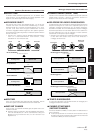
¶ Turning auto cueing on and off
Pressing the TIME MODE/AUTO CUE button and holding it down for
a second or more causes auto cueing to be alternately turned on and
off.
When auto cueing is on, the auto cueing indicator (A. CUE) will be lit
up.
¶ Auto cueing is automatically turned on when the power to the CMX-
5000 is first turned on.
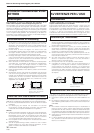
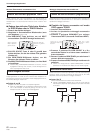
Starting playback
1. Insert a disc into Player A or Player B.
2. If auto cueing is on, press the PLAY/PAUSE button
(3/8).
¶ Wait for the CUE button indicator to light up before pressing the
button. The silent portion at the beginning of the displayed track
will be skipped and playback will begin instantaneously from the
first bars of the track.
Once the first track has been played, the player will automatically search
for the beginning of the next track to be played. The cueing indicator
(CUE) will light up, the PLAY/PAUSE button indicator will flash, and the
player will then wait for the PLAY/PAUSE button (3/8) to be pressed
before beginning playback of the next track.
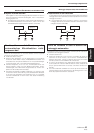
3. If auto cueing is off, playback will begin automati-
cally from the first track.
¶ When auto cueing is off, playback will continue after the first track
has been played, with all subsequent tracks being played in
sequence.
¶ When playback of the final track is complete, playback will
automatically come to an end.
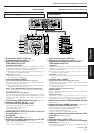
CUE
REV FWD
SEARCH
PLAY/PAUSE
EJECT
TRACK SEARCH
LOOP
OUT EXIT RELOOP
TIME MODE TEMPO
MT
MASTER
TEMPO
0
±6/±10/±16
AUTO CUE
IN/REALTIME CUE
6
0
4¢
1¡
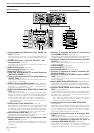
AUTO MIX PLAY
BPM SYNC
SHORT TIME
AB
TRACKDISC PROGRAM
PLAY MODE SELECT
CLEAR
PLAYER SELECT
BPM/TRACK
PUSH ENTER
BPM/TRACK
SHORT TIME CHANGE MIX TIME
INSTANT
CHANGE
MIX MODE SELECT
BPM
NEXT
MINMAX
TRACK
LOOP
TEMPO
BPM
1765432
131211109
171819201615
148
REMAIN
MSF
16
10
6
A.CUE
RELOOP
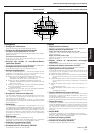
A•B AUDIO-OUT SELECT
POWER
MONITOR
MIN MAX
PHONES
A•B A•B/
AUTO MIX
PLAYER SELECT
AB
EJECT
DISC
A PLAYER
'
0
OUT ADJUST
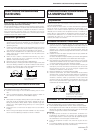
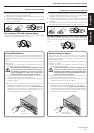
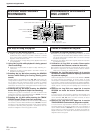
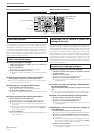
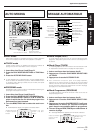
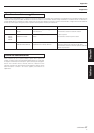
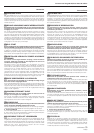
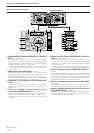
Playing discs on Player A (Operation identical for Player B) Lecture de disques sur le lecteur A
(fonctionnement identique pour le lecteur B)
Repérage automatique
Le repérage automatique permet de spécifier automatiquement le point
de repérage (voir page 19) à utiliser pour commencer réellement la
lecture lorsque vous insérez un disque ou que vous procédez à une
recherche de plage.
¶ Activation et désactivation du repérage automatique
Appuyez sur la touche TIME MODE/AUTO CUE et maintenez-la
enfoncée pendant une seconde au moins pour activer et désactiver
successivement le repérage automatique.
Quand le repérage automatique est activé, le témoin de repérage
automatique A.CUE brille.
¶ Le repérage automatique est automatiquement activé lors de la
première mise sous tension du CMX-5000.
Lancement de la lecture
1. Insérez un disque dans le lecteur A ou le lecteur B.
2. Si le repérage automatique est activé, appuyez sur
la touche PLAY/PAUSE (3/8).
¶ Attendez que le témoin CUE s’allume avant d’appuyer sur la
touche. Les silences du début de la plage affichée sont sautés et
la lecture commence instantanément à partir des premières
barres de la plage.
Quand la lecture de la première plage est terminée, l’appareil recherche
automatiquement le début de la plage suivante à lire. Le témoin de
repérage CUE brille, le témoin de la touche PLAY/PAUSE clignote et le
lecteur attend que vous appuyiez sur la touche PLAY/PAUSE (3 /8) pour
poursuivre la lecture de la plage suivante.
3. Si le repérage automatique est désactivé, la
lecture commence automatiquement à partir de la
première plage.
¶ Quand le repérage automatique est désactivé, l’appareil poursuit
la lecture de chaque plage successive après la fin de la première
plage.
¶ A la fin de la dernière plage, la lecture s’arrête automatiquement.
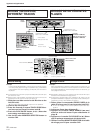
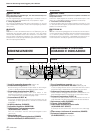
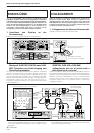
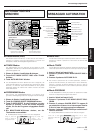
Basic Operation/Fonctionnement de base
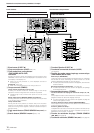
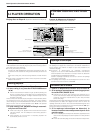
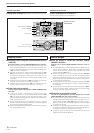
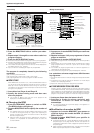
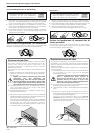
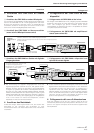
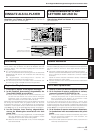
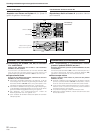
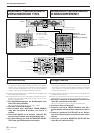
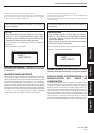
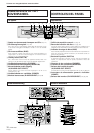
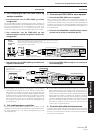
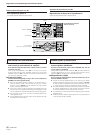
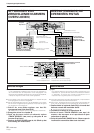
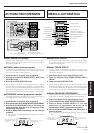
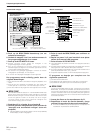
Remote control unit
Télécommande
Player
Lecteur
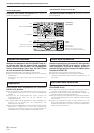
TIME MODE/AUTO CUE
EJECT
EJECT
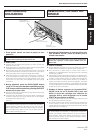
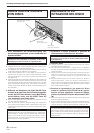
Disc insertion slot
Fente d’insertion du disque
PLAY/PAUSE
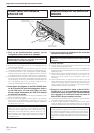
Monitor switching button
(PLAYER SELECT)
Sélecteur de lecteur (PLAYER SELECT)