Display Modes
Level Indicator Display
This product has eight display patterns (Mode 1 to Mode 8) from which you can choose one
at a time.
• Selecting the Level Indicator display.
Each press of the DISPLAY button changes the display in the following order:
Mode 1 Ô Mode 2 Ô Mode 3 Ô Mode 4 Ô Mode 5
Ô Mode 6 Ô Mode 7 Ô Mode 8 Ô Mode 1 ...
Mode 1, Mode 2, Mode 3 and Mode 4
Segments light from left to right according
to the audio level.
Mode 5
Segments light from the center, and
expand towards the sides according to the
audio level.
Mode 6
Display shows segments rotating from left
to right.
Mode 7
Depending on the audio level, different
segments light up.
Mode 8
Display turns off except for the “DISC SET”
and “PLAY” indications.
Each press changes the Display ...
Precaution
• Keep this manual handy as a reference for operating procedures and precautions.
• Protect the product from moisture.
After-sales Service for Pioneer Products
Please contact the dealer or distributor from where you purchased the product for its after-
sales service (including warranty conditions) or any other information. In case the necessary
information is not available, please contact the companies listed below:
Please do not ship your product to the companies at the addresses listed below for repair
without advance contact.
For warranty information please see the Limited Warranty sheet included with your product.
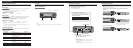
Playing the CD Player
The CD player plays one standard 12 cm or 8 cm CD at a time. Do not use any adapter when
playing a 8 cm CD.
1. Insert the disc with the label side up.
2. For details concerning operation, refer to the back page of this manual.
3. Remove the disc.
Note:
• A disc left partially inserted after ejection may incur damage or fall out.
• If a disc cannot be inserted fully or playback fails, make sure the recorded side is down. Press the
EJECT button and check the disc for damage before reinserting it.
• If a CD is inserted with the recorded side up, it will be ejected automatically after a few moments.
• If the CD player cannot operate properly, an error message (such as “ERROR-14”) appears on the
head unit display. Refer to “CD Player Troubleshooting”.
• Do not insert anything other than a CD into the CD Loading Slot.
Lights up when a CD is playing.
Lights up when a CD is loaded.
Using the CD Player
CAUTION: USE OF CONTROL OR ADJUSTMENT OR PERFOR-
MANCE OF PROCEDURES OTHER THAN THOSE SPEC-
IFIED HEREIN MAY RESULT IN HAZARDOUS RADIA-
TION EXPOSURE.
CAUTION: THE USE OF OPTICAL INSTRUMENTS WITH THIS
PRODUCT WILL INCREASE EYE HAZARD.
7U.S.A.
Pioneer Electronics Service, Inc.
CUSTOMER SERVICE
DEPARTMENT
P.O. Box 1760
Long Beach, CA 90801
800-421-1404
7CANADA
Pioneer Electronics of Canada, Inc.
CUSTOMER SATISFACTION
DEPARTMENT
300 Allstate Parkway
Markham, Ontario L3R OP2
(905) 479-4411
1-877-283-5901
Before Using This Product
About This Manual
Operate this CD Player with a Head Unit connected. For details concerning operation, refer
to the back page of this manual.
Important
The serial number of this device is located on the bottom of this product. For your own secu-
rity and convenience, be sure to record this number on the enclosed warranty card.
Resetting the Microprocessor
The microprocessor must be reset under the following conditions:
When using this product for the first time after installation.
When the machine fails to operate properly.
When strange (incorrect) messages appear on the display.
• To reset the microprocessor, press the RESET button with a pen tip or other
pointed instrument.