6
<DRB1232>
En
BEFORE OPERATIONS: CONNECTIONS
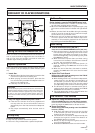
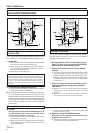
3. POWER CORD CONNECTIONS
After all other connections are made, connect the power
cord to a household wall outlet or to the auxiliary AC
power takeoff on your amplifier.
÷ Make sure plugs are fully inserted into the jacks and
wall outlet.
NOTE:
If you do the following actions when the disc is spinning
in the unit, the unit may malfunction.
1) Set the power switch to off, then on.
2) Disconnect the power cord, then connect again.
To correct, press the EJECT button to stop the disc. You
may then resume player operation.
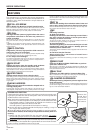
POWER-CORD CAUTION
Handle the power cord by the plug. Do not pull out the
plug by tugging the cord and never touch the power cord
when your hands are wet as this could cause a short
circuit or electric shock. Do not place the unit, a piece of
furniture, etc., on the power cord, or pinch the cord.
Never make a knot in the cord or tie it with other cords.
The power cords should be routed such that they are
not likely to be stepped on. A damaged power cord can
cause a fire or give you an electrical shock. Check the
power cord once in a while. When you find it damaged,
ask your nearest PIONEER authorized service center or
your dealer for a replacement.
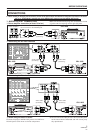
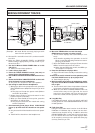
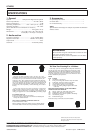
When using two players in tandem, connect the CON-
TROL jacks of the two players. This makes it possible to
achieve automatic alternate operation of the two play-
ers. For details, see p. 12.
NOTE:
Fader start and relay play cannot be performed simultane-
ously, since different control cable connections are required.
CDJ-100S
CDJ-100S
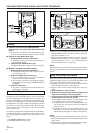
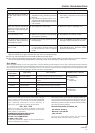
B Fader starting by DJM-500
CDJ-100S CDJ-100S
Use a commercially available mini-
plug (dia. 3.5 mm; either stereo or
monaural can be used) cable to con-
nect the CONTROL jacks.
C Relay play using two players
This makes it possible to achieve automatic
alternate operation of the two players.
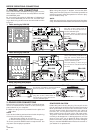
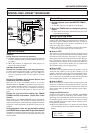
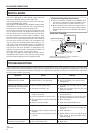
2. CONTROL JACK CONNECTIONS
Use a commercially available mini-plug (dia. 3.5 mm;
either stereo or monaural can be used) cable to connect
the CONTROL jacks.
By connecting the optional DJM-300 or DJM-500 DJ
mixer to the CONTROL jack of this unit, the fader start-
ing or back cuing of this unit can be controlled from the
DJ mixer.
A Fader starting by DJM-300
Use a commercially available mini-
plug (dia. 3.5 mm; either stereo or
monaural can be used) cable to con-
nect the CONTROL jacks.
The fader starting or back cuing of
this unit can be controlled from the
DJ mixer.
The fader starting or back cuing of
this unit can be controlled from the
DJ mixer.
CDJ-100SCDJ-100S
Use a commercially available mini-
plug (dia. 3.5 mm; either stereo or
monaural can be used) cable to con-
nect the CONTROL jacks..