


13
<DRB1339>
En
Applying Master Tempo (*)
Press the MASTER TEMPO button during playback.
The MASTER TEMPO button and the [MT] indicator light. The speed (tempo)
can now be changed using the Tempo Control knob but the pitch (key) does not
change.
¶ Sound quality will be degraded when subjected to digital processing.
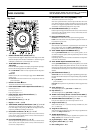
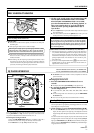
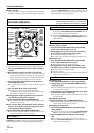
Jog Dial Functions (*)
1. Turning the Jog dial during playback (pitch bending)
(When the JOG MODE SELECT button is set to VINYL, touch the Jog dial
side. The Jog dial operates differently when the surface of the Jog dial is pressed.)
¶ In proportion to the amount of rotation, the playback speed is accelerated
(FWD+) or decelerated (REV–). When in the reverse mode, the playback
speed accelerates when the dial is rotated in the REV– direction, and decel-
erates when rotated in the FWD+ direction.
¶ When rotation stops, the disc returns to normal speed.
2. Turning Jog dial during playback (scratch play)
(See page 14: Scratch Play)
3. Turning the Jog dial in pause mode (frame search)
(When JOG MODE is set to CDJ, the unit enters the audible pause mode, and
when set to VINYL, the unit enters the ordinary muted pause mode (no audi-
ble sound); CD sound is played back at a speed corresponding to the speed with
which the Jog dial is rotated.)
¶ Searches can be performed in 1-frame increments.
¶ When the CD is rotated once using the Jog dial, 1.8 seconds (135 frames) of
music is played back.
4. During playback or turning in the pause condition (Spin)
Refer the [How to Spin] advanced operation.
Changing Playback Speed (*)
Pull the Tempo Control knob towards you.
Slide the knob towards you (+) to increase the tempo and slide it away from you
(–) to decrease it.
¶ The rate of change in playback speed (tempo) is shown in the display.
¶ The playback speed can be changed without changing the pitch (☞ “Apply-
ing Master Tempo”).
7 Selecting range of tempo adjustment
Press the TEMPO ±6/±10/±16/±100 WIDE button.
Each time the button is pressed the variable range of the Tempo Control knob
changes as follows: ±6%, ±10%, ±16% and ±100%. You can adjust as follows: at
±6% :0.02%units, at ±10%:0.05%units, at ±16% :0.05%units, at ±100%:0.5%units.
¶ The set variable range value is indicated in the display. (When ±100% is se-
lected, the WIDE indicator appears in the display.)
7 Resetting tempo
Press the TEMPO RESET button.
The Tempo Reset indicator lights and the rate of tempo variation is reset to [0]
(normal tempo) regardless of Tempo Control knob setting.
¶ One more press of the TEMPO RESET button cancels the reset and speed
setting made with the Tempo Control knob is valid again.
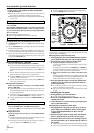
5. During playback, rotate the Jog dial while holding the
SEARCH button (1, ¡) depressed. (Super-fast
search)
Hold down the button while turning the Jog dial in the direction you wish to
search to enter fast forward or fast reverse mode.
6. Rotate the Jog dial while holding the TRACK SEARCH
button (4, ¢) depressed. (Super-fast track search)
While holding the TRACK SEARCH button (4, ¢)depressed, rotate
the Jog dial in the direction in which you wish to perform track search; acceler-
ated high-speed track search will begin in accordance with the direction and
mount of rotation.
NOTE:
The Jog dial contains a switch.
Do not put objects on the Jog dial or apply too much force.
Do not put drinks on the Jog dial as it may leak inside the dial and be the
cause of a malfunction.
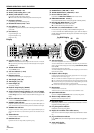
Mixing Different Tracks
(Example: Mix track B with currently playing track A from the main speakers.)
÷ Connect CD1 to the DJ mixer’s CH 1, and connect CD 2 to CH 2.
÷ Raise the TRIM, CHANNEL FADER, and MASTER LEVEL settings appropriately
so that sound is produced from CD1.
1.
Set the DJ Mixer’s CROSS FADER slider at its left side (CH 1).
÷ Track A is heard from speakers.
2. Load a CD on player CD2.
3. Press the TRACK SEARCH buttons (4, ¢) on player
CD2 to find and select track B.
4. Set the DJ Mixer’s MONITOR SELECTOR button CH 2 to
ON.
5. Rotate the DJ Mixer’s MONITOR LEVEL so that track B
can be heard from the headphones.
÷ Only track A is heard from the main speakers.
6. Set cueing for track B on the headphones.
1 With player CD2 in the playback mode, press the PLAY/PAUSE button
(6) to hear the point you wish to cue.
÷ When the JOG MODE is set to CDJ, the unit will enter audible pause
mode (sound can be heard); when set to VINYL, the unit will enter
inaudible pause mode (no sound can be heard).
2 Rotate player CD2’s Jog dial and search for the track’s Cue point (first beat).
3 When you have settled on the Cue point, press the CUE button on player
CD2.
÷ The player’s sound will be muted and cueing will be completed.
7. Simultaneously press player CD2’s PLAY/PAUSE button
(6) when track A is heard from the speakers.
÷ Only track A will be heard from the main speakers.
÷ Track B will be heard from the headphones.
8. Move the TEMPO slider to match the tempo (BPM=Beat Per
Minutes) of tracks A and B.
Move the TEMPO slider of player CD2 so that the BPM of track B matches those
of track A.
÷ When the two BPM rates match, the BPM synchronization is complete.
9. Press the CUE button on player CD2.
÷ Player CD2 will enter pause mode at the Cue point.
10.
As soon as track A is heard from the speakers, press the
PLAY/PAUSE button (6) on player CD2.
÷ Track B begins playing.
11.
While checking the sound on the headphones, gradually
move the DJ Mixer’s CROSS FADER slider from left to
right.
÷ The sound of track A from the speakers will steadily become mixed with the
sound of track B.
÷ When the DJ Mixer’s CROSS FADER slider has moved all the way to the
right side, the sound heard from the speaker will have changed from track
A to track B, and the operation is complete.
7 Long mix play
If the BPM rates match, mixing of tracks A and B will sound good even if the
CROSS FADER slider is in the middle position.
[Amending the Cue point]
1. During playback, press the CUE button.
¶ This will take you back to the set track position.
2. In the VINYL mode, to set the Cue point, go through
steps 2 and 3 as mentioned above.
÷ The SEARCH buttons (1, ¡) can now be used to modify the cue
point, in the same way as for the CDJ mode.
7 Real-time cue
During playback, press the LOOP IN/REALTIME CUE button at the
desired Cue point.
¶ This point will then be recorded as the new Cue point.
7 Checking cue points (Cue point sampler)
After specifying a cueing point, press the CUE button.
¶ The sound at the specified Cue point will continue to play as long as the
CUE button is pressed.
7 Returning to a Cue point (Back cue)
1. During playback, press the CUE button.
¶ The player will return to the specified Cue point.
2. Press the PLAY/PAUSE button (3/8).
¶ Playback will begin immediately from the specified Cue point.
BASIC OPERATION: DJ PLAYER OPERATION