


9
<DRB1339>
En
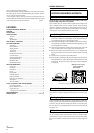
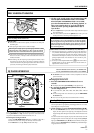
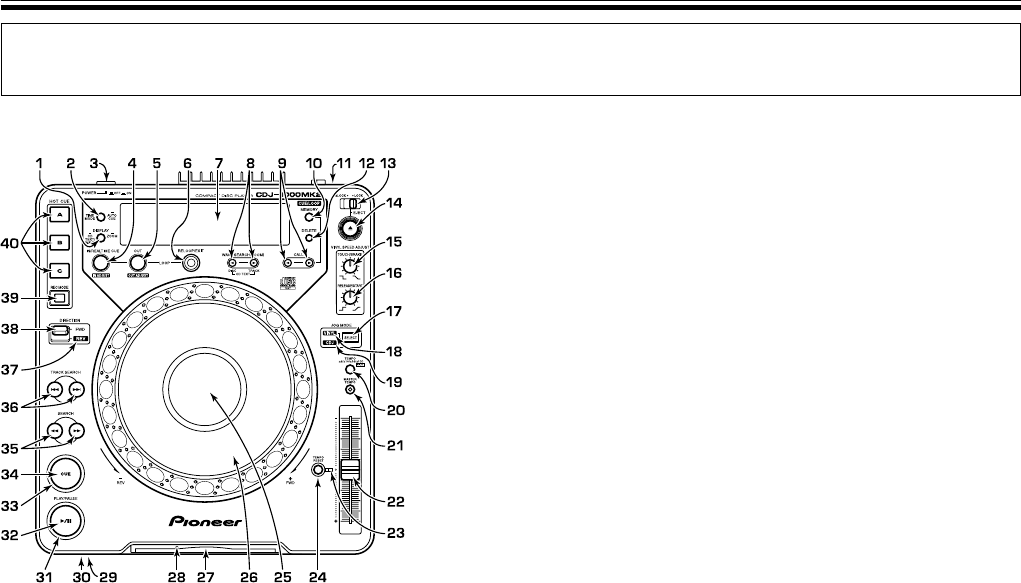
PANEL FACILITIES
BEFORE OPERATIONS
1 DISPLAY CD TEXT/WAVE (ZOOM) button (*)
Each press of this button toggles the display between WAVE display and CD-TEXT
disc/track title display. When the button is held down for 1 second or longer, the
WAVE display cycles between the 1 track full-scale and 2x zoom scale.
2 TIME MODE/AUTO CUE button (*)
TIME MODE:
Each time this button is pressed, the time display changes between elapsed play-
back time and remaining playback time (REMAIN) of each track.
÷ The TIME MODE is stored in memory and persists even when the power is
turned off.
AUTO CUE:
Hold down this key for 1 second or longer to toggle between AUTO CUE on
and off. ☞ P.11
÷ AUTO CUE on/off status is stored in memory and persists even when the
power is turned off.
3 POWER switch OFF —/ON _
This switch is located on the rear panel of the unit.
4 LOOP IN/REALTIME CUE/IN ADJUST button/indicator (*)
Real-time cue ☞ P. 1 3
Enter loop in point ☞ P. 1 4
Loop in point adjust ☞ P. 14
5 LOOP OUT/OUT ADJUST button/indicator (*)
Enter loop out point ☞ P. 14
Loop out point adjust ☞ P. 14
6 RELOOP/EXIT button (*) ☞ P. 15
7 Display ☞ P. 10 .... 51–69
8
WAVE SEARCH (ZOOM)/CD TEXT buttons (2, 3) (*) ☞ P. 1 5
This button moves the displayed area when WAVE is in zoom display mode.
In the TEXT display mode, pressing the 2 button will display the disc title
and pressing the 3 button will display the track title.
9 CUE/LOOP CALL buttons (2, 3) (*) ☞ P. 16
Calls Cue points and Loop points stored in internal memory or external memory
(when a memory card is inserted). (When a memory card is inserted, the ex-
ternal memory takes precedence.)
10 CUE/LOOP MEMORY button (*) ☞ P. 16
Stores Cue points and Loop points in internal memory or external memory
(when a memory card is inserted). (When a memory card is inserted, the ex-
ternal memory takes precedence.)
11 DIGITAL OUT mode switch (DJ/NORMAL) ☞ P. 8
This switch is located on the unit’s rear panel.
When set to DJ, the DIGITAL OUT connector outputs audio data alone. When
set to NORMAL, digital data (including sub-codes) is output, but the unit’s DJ
functions are not supported (operation buttons marked with the asterisk (*)
are disabled). No sound will be produced in the Pause mode.
12 CUE/LOOP DELETE button (*) ☞ P. 16, 17
Deletes Cue points or Loop points stored in internal memory or external memory
(when memory card is inserted). (When a memory card is inserted, the exter-
nal memory takes precedence.)
13 EJECT UNLOCK/LOCK switch
UNLOCK: In this mode the disc can be ejected even during playback.
LOCK: In this mode, the disc cannot be ejected during playback. The disc can
be ejected when in pause mode.
14 EJECT button (0)
When this button is pressed the disc is ejected through the disc insertion slot
when it stops rotating. When the EJECT UNLOCK/LOCK switch is set to
[LOCK] position, the disc can only be ejected when in pause mode.
15 VINYL SPEED ADJUST TOUCH/BRAKE dial (*)
When the JOG MODE SELECT button is set to [VINYL] position, you can
use this dial to adjust the speed by which the playback stops when the surface
of the Jog dial is pressed.
Playback stops faster as the dial is turned counterclockwise and stops slower
as the dial is turned clockwise.
16 VINYL SPEED ADJUST RELEASE/START dial (*)
When the JOG MODE SELECT button is set to [VINYL] position, you can use this
dial to adjust the speed by which playback starts after you take your hand off the
surface of the Jog dial. Playback starts normal speed faster as the dial is turned
counterclockwise and takes longer time to return to normal speed when turned
clockwise.
17 JOG MODE SELECT button (*)
VINYL mode: when the surface of the Jog dial is pressed during playback, play-
back stops and if the dial is rotated, music is output according to the speed the dial
is turned.
¶ The JOG MODE is stored in memory and remains in memory even if the
power is turned off.
CDJ mode: above operation is not performed even when the Jog dial surface
is pressed.
18 VINYL indicator (*)
This indicator lights when the JOG MODE is in VINYL mode.
19 CDJ indicator (*)
This indicator lights when the JOG MODE is in CDJ mode.
20 TEMPO Control Range button
±6/±10/±16/±100 WIDE
(*)
Each time the button is pressed, the range changes (±6%/±10%/±16%/±100%).
21 MASTER TEMPO button/indicator (*) ☞ P.13
Each press of the button turns the master tempo function on or off.
22 Tempo Control knob (*)
Slide the knob towards you (+) to increase the tempo and slide it away from
you (–) to decrease it.
23 Tempo Reset indicator (*)
Shows that the tempo has been reset to [0] (normal tempo) regardless of the
position of the Tempo Control knob.
24 TEMPO RESET button (*)
Resets the tempo to [0] (normal tempo) regardless of the position of the
Tempo Control knob. Press button once more to release it.
25 Jog Dial Display ☞ P.10 .... 81–85
26 Jog dial (+FWD/–REV) (*) ☞ P.13
27 Disc Loading Slot ☞ P.11
Top Panel
Operation buttons marked with the asterisk (*) are disabled
when the DIGITAL OUT mode switch is set to NORMAL.