


Connecting up02
10
En
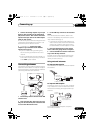
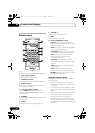
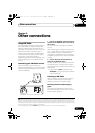
Connecting the speakers
Make sure you connect the speaker on the
right to the right terminal and the speaker on
the left to the left terminal. Also make sure the
positive and negative (+/–) terminals on the
receiver match those on the speakers. You can
use speakers with a nominal impedance
between 4 Ω–16 Ω.
Be sure to complete all connections before
connecting this unit to the AC power source.
• Connect the speakers to the speaker
terminals as shown above.
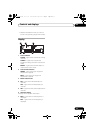
Connections for the left speaker are shown.
Connect the right speaker in the same way. You
can use either bare wire connections or
banana plugs to do this (see below).
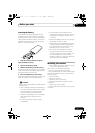
Bare wire connections
Make sure that the speaker cable you’re going
to use is properly prepared with about 3/8 inch
of insulator stripped from each wire, and the
exposed wire strands twisted together (fig. A).
To connect a terminal, unscrew the terminal a
few turns until there is enough space to insert
the exposed wire (fig. B). Once the wire is in
position, tighten the terminal until the wire is
firmly clamped (fig. C).
Important
• Please refer to the manual that came with
your speakers for details on how to connect
the other end of the speaker cables to your
speakers.
Caution
• These speaker terminals carry
HAZARDOUS live voltage. To prevent the
risk of electric shock when connecting or
disconnecting the speaker cables,
disconnect the power cord before touching
any uninsulated parts.
• Make sure no exposed speaker wire is
touching the rear panel, this may cause the
receiver to turn off automatically.
Plugging in
Make sure to complete all connections before
connecting to an AC outlet.
• Connect the AC power cord to the AC IN
inlet on the rear panel of the receiver, then
plug into a power outlet.
PHONO
L
R
GND
CONTROL
AC IN
SPEAKER L
SIGNAL
OUT
O
UT
Left speaker
3
/8 in.
fig. A fig. B fig. C
A6_KU.book 10 ページ 2006年11月13日 月曜日 午後3時1分