


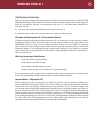


UNDERSTANDING THE INDICATORS AND CONTROLS ON THE JC 1
8
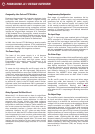
A
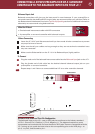
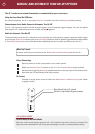
AC Present Indication
When the JC 1 is plugged into a live AC outlet, a soft blue halo glows behind its On-Off button and its
red “P” Badge glows faintly. These indicate that the JC 1 is plugged into a live AC outlet, even when it is
turned off.
On and Off Indications for Both Manual and Automatic Modes
When the JC 1 is rst turned on, the soft blue glow behind its On-Off button turns red for about ve
seconds and then becomes a brighter blue.
High-Temp Indicator
This indicator is near the right side of the panel recess. It will glow red if the JC 1 overheats.
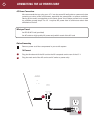
Ground Switch
The Ground switch can assist in reducing audible hum caused by ground loops in your system. Leave
this switch in its Normal (right) position unless you hear hum through your speakers (you’ll only be able
to hear this hum after your entire system is installed and operating). You can try the Lift (left) position to
eliminate it. Refer to the Technically Speaking section for detailed technical information about the causes
of ground loops and what you can do about them.
Bias Level Switch
The Bias Level switch offers two bias setting for the output transistors. In its Low (left) position, extremely
generous bias idle current and class A operation make crossover and higher-order odd harmonic
distortion inaudible. In its High (right) switch position, bias idle current is increased to perfectly match
the characteristics of the JC 1s output devices. This all but banishes these distortions. With its Bias Level
switch set to High, the JC 1 will run quite warm and consume more AC power when it is idling or playing
at low listening levels. If your JC 1 is VERY well ventilated, you may nd the high bias offers a sonic
improvement. If your JC 1 is mounted in a cabinet, or ventilation is restricted in any way, we recommend
you leave the Bias Level Switch in its Low position.
B
C
D
E
A
B
C
D
None
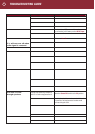
4
8
12
20 50
100
200
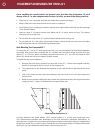
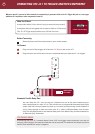
Auto Turn On
Delay
Seconds
Sensitivity
Input mV
Select
<
<
Select
<
<
Audio
Signal
<
Manual
12V Input
12 Volt
Trigger
Trigger
Output