


12
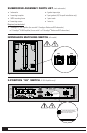
1. Mounting
(continued)
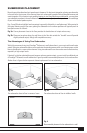
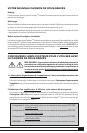
Damping Material and Other Acoustic Treatments
TIP!
To ensure optimal results, do not compact damping material during the damping process. Additional
soundproofing treatments
(i.e. Dynamat
®
)
can be used against the back wall of the cavity as well as on
the inside front of the wall
(see Dealer for more information)
.
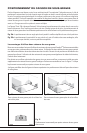
Damping the Cavity:
For optimum performance, loosely place a minimum of …
• Two pieces, 8˝ (20 cm) to 12˝ (30 cm) long, of standard fiberglass insulation in the wall. R-12 for 2˝ x 4˝
(5 cm x 10 cm) walls or R-20 for 2˝ x 6˝ (5 cm x 15 cm) walls. Place one piece just above and the other
just below the mounting hole;
• A half-thick piece of fiberglass insulation, the same height as the subwoofer, in the wall directly behind
the mounting hole, allowing enough space for the subwoofer to properly recess into the cavity.
2. Connecting and Installing
You are now ready to connect and install the subwoofer. If you are color-match painting do so now
before proceeding. Follow the painting instructions provided earlier.
With grille removed …
Connecting Subwoofer:
Connect subwoofer cable as outlined in the Owners Manual included with your Paradigm
®
subwoofer
amplifier
(sold separately)
. Once connected …
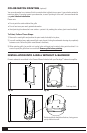
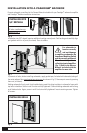
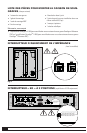
Installing Subwoofer
(Fig. 5g):
Leave port covers in place. (Covers are only removed if installing into an optional Paradigm
®
Backbox.)
IMPORTANT!
Installation into 5/8˝ drywall requires additional sealing around ports (Fig. 6).
Holding the subwoofer firmly …
a) Tip it into the mounting frame, making sure the holes in the top of the MDF frame align with the
holes in the top of the subwoofer frame.
b) Insert screws into top holes. Screw in until firm, but not fully tightened.
c) Continue holding subwoofer firmly while lining up bottom holes in MDF frame with bottom holes
in subwoofer frame. Again, screw in until firm, but not fully tightened.
d) Insert all remaining screws, then firmly tighten all screws.
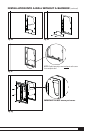
3. Installing the Grille
Press the grille into the groove on the front face of the subwoofer (Fig. 8).
INSTALLATION INTO A WALL WITHOUT A BACKBOX
(continued)