


11
IMPORTANT! INSTALLING SUBWOOFER INTO A PARADIGM
®
BACKBOX
Instructions for installing your subwoofer into a backbox were provided with the backbox. If you no longer
have those instructions, follow the instructions on the previous page.
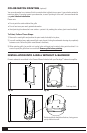
STIFFENING AND STRENGTHENING THE CAVITY
Although Paradigm
®
in-wall mounting systems are the most rigid on the market, when installing your
subwoofer directly into a wall, to minimize acoustic bleed-through, we recommend the following:
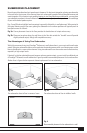
Additional Bracing
Additional cross-bracing will further stiffen the cavity. We suggest placing two to three pieces of 2˝ x 4˝
(more if application allows) within the cavity, evenly spaced above and below the cutout. Additional
bracing can also be sandwiched to the studs on either side of the subwoofer.
New Construction
New construction offers an excellent opportunity to strengthen and stiffen the cavity with additional
bracing or construction-grade stiffening adhesives applied directly to the drywall.
(See Dealer for
more information.)
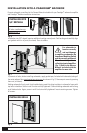
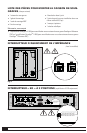
1. Mounting
TIP!
Damping the cavity may be done before or after installing the MDF mounting frame. See subsection
“Damping Material and Other Acoustic Treatments” on next page.
a) Keeping in mind the recommendations for placement provided earlier, place cardboard mounting
template onto wall. Cut hole as indicated (Fig. 5a).
Installing the MDF Mounting Frame:
Your Paradigm
®
Reference in-wall subwoofer comes with an MDF mounting frame. DO NOT
try to install frame on the outside of the hole, it is designed to sit behind the cutout, providing
support for the weight of the subwoofer
.
b) Remove double-sided tape (Fig. 5b).
c) Tip frame into wall cutout (Fig. 5c).
TIP!
The MDF frame has a raised positioning block to help you align it with the cutout. Position frame
so that block is at bottom, facing you. Angle frame slightly to make it easier to tip into wall.
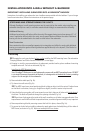
d) Using the block as your guide, pull frame toward you so that it aligns on all sides with inside edges
of
the cutout. The block will protrude through the opening at bottom (Fig. 5d).
TIP!
Press frame firmly against the inside of the wall, smoothing on all sides to engage adhesive. Once
tape adheres to wall it will be difficult to reposition frame, so correct alignment initially is very important.
e) Remove positioning block by removing screws that hold it in place; discard (Fig. 5e).
f) To prevent air leaks, before installing subwoofer, apply gasket tape
(included)
along all four sides of
MDF frame (as shown in Fig. 5f). Tape must overlap on all four corners.
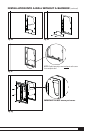
INSTALLATION INTO A WALL WITHOUT A BACKBOX