


19
RQT9584
Getting StartedPlaying DiscsOther OperationsReference
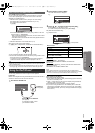
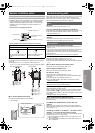
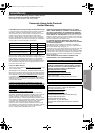
You can attach all of the speakers (except subwoofer) to a wall.
≥The wall or pillar on which the speakers are to be attached should be
capable of supporting 10 kg (22 Ibs) per screw. Consult a qualified
building contractor when attaching the speakers to a wall. Improper
attachment may result in damage to the wall and speakers, and
personal injury.
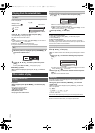
1 Drive a screw (not supplied) into the wall.
2 Fit the speaker securely onto the screw(s) with the hole(s).
∫ Tips
Use the measurements indicated below to identify the screwing positions
on the wall.
≥Leave at least 20 mm (
25
/32q) of space above the speaker and
10 mm (
13
/32q) on each side to allow enough space for fitting the speaker.
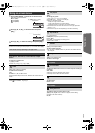
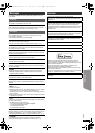
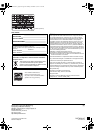
∫ To prevent speakers from falling
Front speaker, Surround speaker, Center speaker
e.g. Front speaker
Before requesting service, make the following checks. If you are in doubt
about some of the check points, or if the solutions indicated in the
following guide do not solve the problem, refer to “Customer Services
Directory (United States and Puerto Rico)” on page 23.
No power.
Insert the AC power supply cord securely. (B 8)
The unit is automatically switched to standby mode.
≥The Sleep timer was working and had reached the set time limit. (B 4)
≥The main unit will automatically switch to standby mode after 30
minutes of inactivity. (B 4)
Power of this unit is turned off when the input for the TV is
changed.
This is normal when using VIERA Link “HDAVI Control 4 or later”. For
details please read the operating instructions for the TV.
No response when any buttons are pressed.
≥This unit cannot play discs other than the ones listed in this Owner’s
Manual. (B 18)
≥The unit may not be operating properly due to lightning, static electricity
or some other external factor. Turn the unit off and then back on.
Alternatively, turn the unit off, disconnect the AC power supply cord, and
then reconnect it.
≥Condensation has formed. Wait 1 to 2 hours for it to evaporate.
No response when remote control buttons are pressed.
≥Check that the battery is installed correctly. (B 8)
≥The battery is depleted. Replace it with a new one. (B 8)
≥Aim the remote control at the remote control signal sensor and operate.
(B 4)
Other products respond to the remote control.
Change the remote control operating mode. (B 4)
Cannot display the START menu.
Remove the disc and then press [START]B again.
No picture or sound.
≥Check the video or speaker connection. (B 6, 7)
≥Check the power or input setting of the connected equipment and the
main unit.
≥Check that the disc has something recorded on it.
≥During HD JPEG playback, there will be no video output from the
VIDEO OUT terminal.
No on-screen menus/displays.
[JPEG] This is normal during HD JPEG playback.
You have forgotten your ratings password.
Reset all the settings to Factory Preset.
While “DVD/CD” is the source and there is no disc inserted, press and
hold [< OPEN/CLOSE]2 on the main unit and [S10]2 on the remote
control until “RESET” appears on the main unit’s display. Turn the unit off
and on again.
All settings will return to the default values.
Some characters are not displayed correctly.
Characters other than English alphabet and Arabic numerals may not be
displayed correctly.
The VIERA Link “HDAVI Control” function does not
respond.
Depending on the condition of this unit or the connected equipment, it
may be necessary to repeat the same operation so that the function can
work correctly. (B 14)
The setting you made in “TV Aspect” (B 16, Video menu) or
“Display” (B 16, Language menu) does not work.
The settings for “TV Aspect”
§1
and “Display”
§2
will automatically follow the
information from the TV. (B 8, Easy setup)
§1 When using VIERA Link “HDAVI Control” with “HDAVI Control 3 or
later” compatible TV
§2 When using VIERA Link “HDAVI Control” with “HDAVI Control 2 or
later” compatible TV
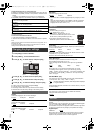
Speaker installation option
Attaching to a wall
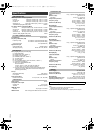
e.g., Surround speaker
DO NOT DO
≥In this position, the speaker will
likely fall if moved to the left or
right.
≥Move the speaker so that the
screw is in this position.
At least 30 mm (1
3
/16q)
‰7.0 mm to ‰9.4 mm
(
9
/32q to
3
/8q)
Wall or pillar
5.5 mm to 7.5 mm (
7
/32q to
5
/16q)
‰4.0 mm (
5
/32q)
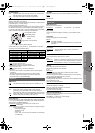
Front/Surround speaker Center speaker
A 24 mm (
15
/16q)
B 116 mm (4
9
/16q)
C 40 mm (1
9
/16q)
D 40 mm (1
9
/16q)
E 18 mm (
23
/32q)
F 65 mm (2
9
/16q)
G 24 mm (
15
/16q)
H 95.5 mm (3
25
/32q)
I 27 mm (1
1
/16q)
Wall
Screw eye
(not supplied)
String (not supplied)
Less than
10 cm (3
15
/16q)
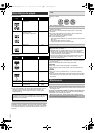
Troubleshooting guide
Power
General operation
SC-XH170 PPC_eng.book 19 ページ 2011年11月25日 金曜日 午前10時43分