


7
VQT5J68
• The LAN cable must be connected or disconnected while
the AC power supply cord is disconnected.
• Use category 5 or above straight LAN cables (STP) when
connecting to peripheral devices.
• Inserting any cable other than a LAN cable in the LAN port
can damage the unit.
• When a LAN cable is connected, wireless settings will be
canceled.
This system has built-in Wi-Fi
®
and can be connected to a
wireless router.
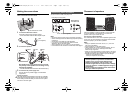
Preparation
• Place this system as close to the wireless network router
as possible.
• Disconnect the LAN cable.
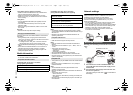
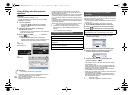
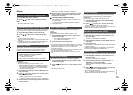
• Point the antenna on the rear of the main unit up as shown
in the figure.
• Do not perform the following:
- Tilting the antenna forward or
backwards when it is pointing up
- Applying too much force to the
antenna
- Carrying this unit by holding the
antenna
1 Turn this system on.
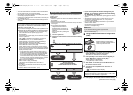
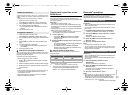
2 Follow the chart below to choose the network setting
method.
• If you want to perform wireless setting with your
Mac/PC, or you want to apply the advanced setting,
try “Method 4” on page 9.
• To cancel this setting in the middle, press [Í] to turn off this
system.
• Simultaneous use with other 2.4 GHz devices, such as
microwaves, cordless telephones, etc., may result in
connection interruptions.
• For up to date compatibility information on your wireless
network router refer to
http://panasonic.jp/support/global/cs/
(This site is in English only.)
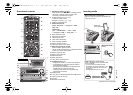
∫ Using the WPS Push Button Configuration
(PBC)
1 Press [SETUP] on the remote control repeatedly to
select “Net Setup” and then press [OK]. *
1
“With iPod” is indicated on the display.
2 Press [SETUP] on the remote control repeatedly to
select “WPS Push” and then press [OK]. *
1
“WPS” flashes on the display.
• Complete step 3 within 2 mins.
3 After “WPS” is indicated, press the WPS button on
the wireless network router.
4 The settings are completed when “Success” is
displayed.
“ ” is indicated on the display.
5 Press [OK] on the remote control to exit the setting.
(Continued on the next page)
You can perform network-related settings individually.
jIf your home wireless network has been configured to
use specific IP Addresses, Subnet Mask, Default
Gateway, Primary DNS, etc.
jIf you want to change the name of this system that is
displayed as the AirPlay speakers or DLNA renderer.
1 Connect the main unit directly to your computer using
LAN cable while the AC power supply cord is
disconnected.
2 Connect the AC power supply cord to the main unit and
turn this system on.
3
After
“ ” is indicated on the display,
check the IP
address for this unit.
(> 15, “IP/MAC Address”)
4 Press [SETUP] on the remote control repeatedly to
select “Net Setup” and then press [OK].
5 Press [SETUP] on the remote control repeatedly to
select “Manual” and then press [OK].
6 When “Setting” blinks on the display, start an Internet
browser on your computer and then type the IP address
for this unit checked in step 3 into the address field and
display the setup screen.
• It may take a few minutes until the setup screen is
available to be displayed on the browser depending
on the environment.In that case, reload the browser.
• If you have reloaded the browser repeatedly for
10 minutes and the setup screen is still not displayed,
perform a memory reset to restore the factory presets
(> 17) and redo the setup from the beginning.
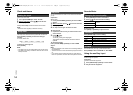
7 Select and input the details.
8 Select “JOIN” to apply the settings.
9 The settings are completed when “Success” is
displayed.
10 Turn off this unit and then disconnect the AC power
supply cord.
11 Perform “Wired LAN connection”. (> 6)
Wireless LAN connection
Does your wireless network router support
WPS?
Yes
l
right,
“Method 1”
l 8,
“Method 2”
l 8,
“Method 3”
No / Do not know
Yes No
Are you using an
iPod touch/iPhone/iPad?
Is the iOS version 5.0 or later?
Method 1
If your wireless network router supports WPS
(Wi-Fi Protected Setup
TM
).
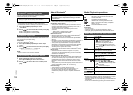
The WPS identifier mark
WPS Push Button Configuration
(PBC) compatible wireless network
router may have this mark.
“Fail” may be displayed if the connection was not made
within the set time limit. Try the setting again. If “Fail” is still
displayed, try other methods on page 8 or 9.
SC-PMX9PP-VQT5J68_mst.book 7 ページ 2014年3月4日 火曜日 午前11時13分