


13
VQT4X66
ENGLISH
13
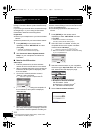
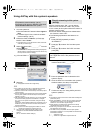
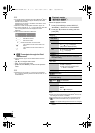
5 Select and input the details.
≥ Check your home wireless network name (Network
name (SSID)) and password for this network. This can
often be found on the wireless network router itself.
6 Select “JOIN” to apply the settings.
≥ In the pop-up screen, select “OK” to continue.
– Select “Cancel” to return to the setup window.
7 The settings are completed when “SUCCESS”
is displayed and the Wi-Fi status indicator
stops blinking and lights in blue.
8 Make sure to connect your compatible device
back to your home wireless network.
*1: If you have set your wireless network to be invisible,
select “BACK” and refer to “Alternative settings”.
≥ The below settings are the alternative or additional
settings for “Method 4”.
(l 12)
≥ Enable Java and Cookies in your browser settings.
≥ This system can also be set using the WPS PIN code.
Replace step 2 of “Method 1” with the following steps.
(Before starting, refer to the wireless network router’s
operating instructions for details on how to enter the PIN
code.)
1 While “WPS” is flashing press and hold [s WPS] again
to display the 8 digit PIN code.
{. Wi-Fi status indicator blinks purple.
2 Enter the PIN code into the wireless network router.
[1] Select your home wireless network name.*
1
[2] Type the password.
If “FAIL” is displayed press [OK], check the
wireless network password and other settings
and start again from step 1.
Advanced network settings
Alternative settings
Instead of steps 4 and 5
Select “Manual settings”.
1 Type your home wireless network name
into the “Network name (SSID)” field.
2 Select the encryption method from the
“Security system” drop down list.
3 Type the password into the “Password” field
and then select “JOIN”.
Additional settings
If your home wireless network has been
configured to use specific IP Addresses, Subnet
Mask, Default Gateway, Primary DNS, etc.
Before step 6
Select “Advanced network settings”.
{. Input the required addresses into each field and select
“JOIN”.
≥ To change the settings back to DHCP, select “ON”
from the “DHCP” drop down list.
If you want to change the name of this system
that is displayed as the AirPlay speakers or DLNA
renderer.
Before step 4
Select “Additional settings”.
1 Select “Edit STEREO SYSTEM name”.
2 Type a new name into the
“STEREO SYSTEM name” field.
{. Only ASCII characters can be used.
3 Select “OK”.
4 If this system is already connected to your
home wireless network:
j
Select “Additional settings”, and then
s
elect “Exit”.
If this system is not connected to your home
wireless network:
jContinue to step 4 of “Method 4”.
SC-NE5GS~VQT4X66.book 13 ページ 2013年3月25日 月曜日 午後3時40分