


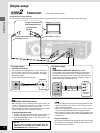
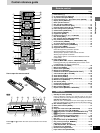

Simple setup
7
RQT6183
Speaker cords
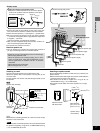
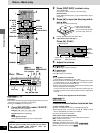
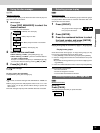
Attaching to a wall
Front and surround speakers can be attached to a wall.
Attach four speaker feet to each speaker, ensuring they do not
cover the holes.
Set the speaker onto screws and slide through bracket to lock
into position.
]HT95]
[HT75]
The method for attaching speakers to a wall is the same except
that there is only one bracket.
Note
The wall or pillar on which the speakers are to be attached should
be capable of supporting 10 kg (22 Ib.) for SB-AFC286 and 5 kg
(11 Ib.) for SB-AFC95 per screw.
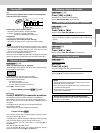
Attaching to speaker stands
Ensure the following conditions are met when you purchase your
speaker stands.
≥Observe the diameter and length of the screws and the distance
between screws as shown in the diagram.
≥The stands must be able to support over 10 kg (22 Ib.) for
SB-AFC286 and 5 kg (11 Ib.) for SB-AFC95.
≥The stands must be stable even if the speakers are in a high
position.
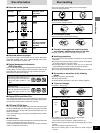
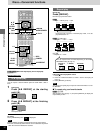
Attach the stickers to the speaker cords.
≥Attach the numbered stickers to the end of the speaker
cords so the numbers match the positions of the speak-
ers shown in the diagram.
1
1
FRONT L
FRONT L
1
1
FRONT L
FRONT L
2
2
FRONT R
FRONT R
3
3
SURROUND L
SURROUND L
4
4
SURROUND R
SURROUND R
5
5
CENTER
CENTER
6
6
SUBWOOFER
SUBWOOFER
1
1
FRONT L
FRONT L
2
2
FRONT R
FRONT R
3
3
SURROUND L
SURROUND L
4
4
SURROUND R
SURROUND R
5
5
CENTER
CENTER
6
6
SUBWOOFER
SUBWOOFER
1
FRONT L
About 10 cm (4")
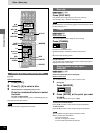
≥Connect the cords to the terminals of same color so the num-
bers on the stickers match the numbers under the terminals.
≥Never short-circuit positive (i) and negative (j) speaker wires.
≥Be sure to connect only positive (red or gray) wires to positive
(i) terminals and negative (black or gray with blue stripe) wires
to negative (j) terminals.
Incorrect connection can damage the speakers.
≥After you have completed setup and connection, wind the ex-
cess cord and keep together with string.
≥
The speaker nets cannot be removed.
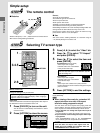
Notes on speaker use
≥You can damage your speakers and shorten their useful life if
you play sound at high levels over extended periods.
R
L
R
L
1
2
3
4
5
6
FRONT
SURROUND
C
E
N
TER
S
U
B
W
O
O
F
E
R
1
F
R
O
N
T
L
2
F
R
O
N
T
R
5
C
E
N
T
E
R
4
SU
R
R
O
U
N
D R
3
S
U
R
R
O
U
N
D
L
6
S
U
B
W
O
O
FER
3
1
2
Center speaker
Front speaker (right)
Surround speaker (right)
Surround speaker (left)
Subwoofer
Front speaker (left)
Twist the vinyl tip and pull off.
Gray
+ Red
- Black
Black
Red
Blue
+ Gray (no stripe)
- Gray with blue stripe
Reduce the volume in the following cases to avoid damage.
–When playing distorted sound.
–When the speakers are receiving howling from a micro-
phone or record player, noise from FM broadcasts, or con-
tinuous signals from an oscillator, test disc, or electronic
instrument.
–When adjusting the sound quality.
–When turning the unit on or off.
Screw (not included)
Speaker feet (included)
Speaker feet
(included)
30–35 mm
(1
3
⁄16q–1
3
⁄8q)
Ø7.5–9.5 mm
(
19
⁄64q–
3
⁄8q)
7–9 mm
(
9
⁄32q–
23
⁄64q)
Screw (not included)
106 mm (4
11
⁄64q)
Attach the stands
with these holes.
60 mm (2
23
⁄64q)
5 mm (
13
⁄64q),
pitch 0.8 mm
(
1
⁄32q)
Plate thickness
plus 7 to 10 mm
(plus
9
⁄32q to
25
⁄64q)
Speaker stand
(not included)