RQTX1249
4
ENGLISH
ENGLISH
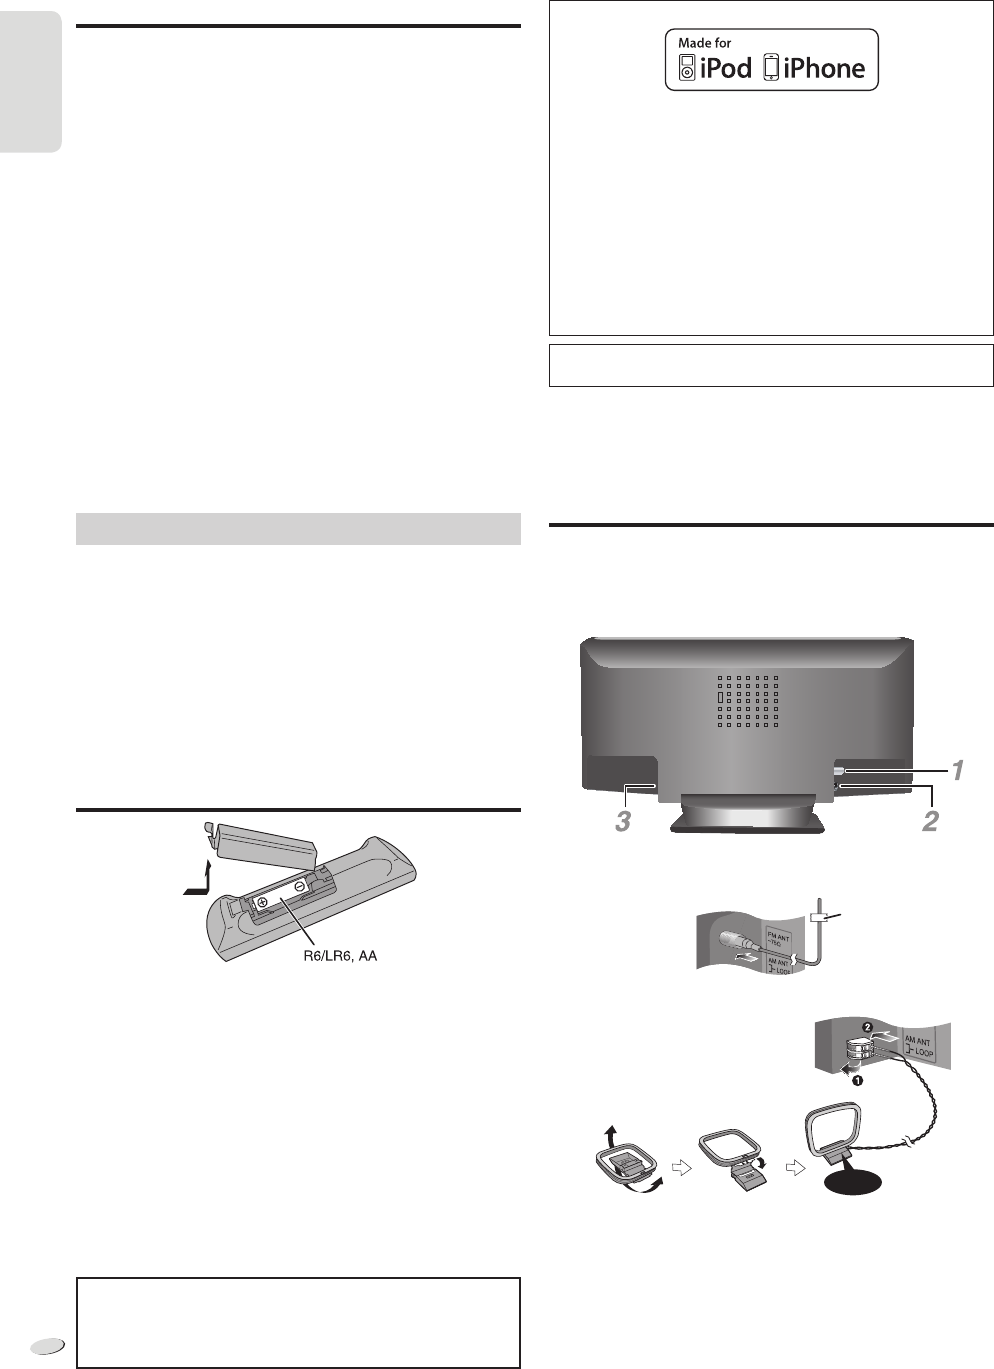
Preparing the remote control
Use alkaline or manganese battery.
Install the battery so that the poles (+ and –) align with those in the
remote control.
Point the remote control at the remote control sensor (Z 5), away from
obstacles, at a maximum range of 7 m (23 feet) directly in front of the
main unit.
CAUTION!
• Do not break open or short-circuit the battery.
• Do not charge the alkaline or manganese battery.
• Do not use the battery if the cover has peeled off.
• Do not heat or expose to flame.
• Do not leave the battery(ies) in an automobile exposed to direct
sunlight for a long period of time with doors and windows closed.
• Mishandling of battery can cause electrolyte leakage, which can
cause a fire.
• Remove the battery if you do not use the remote control for a long
period of time. Keep in a cool, dark area.
CAUTION!
Danger of explosion if battery is incorrectly replaced. Replace only
with the same or equivalent type recommended by the manufacturer.
Dispose of used batteries according to the manufacturer’s
instructions.
(not included)
Table of contents
IMPORTANT SAFETY INSTRUCTIONS ............ 3
Listening caution ............................................... 3
Product service.................................................. 3
Preparing the remote control ........................... 4
Making the connections .................................... 4
Overview of controls ......................................... 5
Discs ................................................................... 6
Using an iPod or iPhone ................................... 7
Radio ................................................................... 8
Clock and timers................................................ 8
Sound effects ..................................................... 9
External equipment ........................................... 9
Remote control code ......................................... 9
Troubleshooting guide ...................................... 9
Maintenance ..................................................... 10
Specifications .................................................. 10
Limited Warranty ..............................................11
EspañolEspañol
Cómo preparar el control remoto .................. 12
Cómo realizar las conexiones ........................ 12
Visión de los controles ................................... 13
Discos ............................................................... 14
Cómo usar un iPod o iPhone ......................... 14
Radio ................................................................. 15
Reloj y temporizador ....................................... 15
Making the connections
Conserving power
The system consumes approximately 0.1 W when it is in standby mode.
Disconnect the power supply if you do not use the system.
Some settings will be lost after you disconnect the system. You have to
set them again.
1
Connect the FM indoor antenna.
Place the antenna where reception is best.
2
Connect the AM loop antenna.
3
Connect the AC power supply cord.
Use the included AC power supply cord with this system only.
Do not use an AC power supply cord from other equipment.
Note:
• These speakers do not have magnetic shielding. Do not put them
near TVs, PCs or other equipment easily influenced by magnetism.
• You cannot remove the net of the speakers.
Adhesive tape
Click!
“Made for iPod” and “Made for iPhone” mean that an electronic
accessory has been designed to connect specifically to iPod, or
iPhone, respectively, and has been certified by the developer to meet
Apple performance standards.
Apple is not responsible for the operation of this device or its
compliance with safety and regulatory standards.
Please note that the use of this accessory with iPod, or iPhone may
affect wireless performance.
iPhone, iPod, iPod classic, iPod nano, and iPod touch are
trademarks of Apple Inc., registered in the U.S. and other countries.
MPEG Layer-3 audio coding technology licensed from Fraunhofer IIS
and Thomson.
SC-HC25_P_en_sp.indd 4SC-HC25_P_en_sp.indd 4 2/10/2011 5:19:59 PM2/10/2011 5:19:59 PM


