


RQT7230
4
Main features
Listening caution
Selecting fine audio equipment such as the unit you’ve just pur-
chased is only the start of your musical enjoyment. Now it’s time
to consider how you can maximize the fun and excitement your
equipment offers. This manufacturer and the Electronic Industries
Association’s Consumer Electronics Group want you to get the
most out of your equipment by playing it at a safe level. One that
lets the sound come through loud and clear without annoying
blaring or distortion—and, most importantly, without affecting your
sensitive hearing.
We recommend that you avoid prolonged exposure to excessive
noise.
Sound can be deceiving. Over time your hearing “comfort level”
adapts to higher volumes of sound. So what sounds “normal” can
actually be loud and harmful to your hearing.
Guard against this by setting your equipment at a safe level
BEFORE your hearing adapts.
To establish a safe level:
Start your volume control at a low setting.
Slowly increase the sound until you can hear it comfortably and
clearly, and without distortion.
Once you have established a comfortable sound level:
Set the dial and leave it there.
Taking a minute to do this now will help to prevent hearing
damage or loss in the future. After all, we want you listening for a
lifetime.
E
L
E
C
T
R
O
N
I
C
I
N
D
U
S
T
R
I
E
S
•
A
S
S
O
C
I
A
T
I
O
N
•
EST. 1924
Product service
1. Damage requiring service—The unit should be serviced by
qualified service personnel if:
(a) The AC power supply cord or AC adaptor has been
damaged; or
(b) Objects or liquids have gotten into the unit; or
(c) The unit has been exposed to rain; or
(d) The unit does not operate normally or exhibits a marked
change in performance; or
(e) The unit has been dropped or the cabinet damaged.
2. Servicing—Do not attempt to service the unit beyond that
described in these operating instructions. Refer all other servic-
ing to authorized servicing personnel.
3. Replacement parts—When parts need replacing ensure the
servicer uses parts specified by the manufacturer or parts that
have the same characteristics as the original parts.
Unauthorized substitutes may result in fire, electric shock, or
other hazards.
4. Safety check—After repairs or service, ask the servicer to
perform safety checks to confirm that the unit is in proper
working condition.
Product information
For product information or assistance with product operation:
In the U.S.A., refer to “Customer Services Directory” on back cover.
In Canada, contact the Panasonic Canada Inc. Customer Care Centre
at 905-624-5505, or visit the website (www.panasonic.ca), or an
authorized Servicentre closest to you.
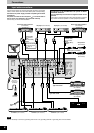
A 4 channel universal type DJ oriented DJ mixer providing new audio
performance and functional with the Technics SL-DZ1200 direct drive
digital turntable (Not included) hereinafter referred to as the digital
turntable.
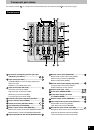
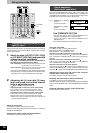
Robust basic functions
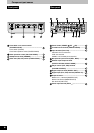
Input-output features
•12 input terminals are available, 2 for CD/LINE input, 3 for LINE
input, 3 for PHONO input, 2 for microphone input and 2 for digital
input.
•Digital output, audio recording output, monitor output, headphone
output, master 1 and 2 output, and a pro-spec engineered XLR
terminal which all function independently.
•An EFFECT SEND, EFFECT RETURN terminals have also been
added for use with an external effector.
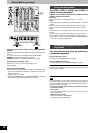
3 Band equalizer for sound-source level
•A HIGH, MID, LOW equalizer is provided for each channel. A wide
variety of possibilities are provided for sound as the attenuation
range is set to a high -24 dB (12 dB/oct).
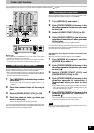
Robust monitor features for play
•Monitoring of the desired channel can be done quickly now that a
CUE button has been added to each channel and to the effect
function.
•Using the MONITOR MIXING control knob you can mix the master
output and the channel selected with the CUE button. Using MONO
SPLIT MODE, you can monitor master output and the selected
channel split separately into the left and right channels.
Support for an external effector
•You can turn EFFECT on and off for each channel. Select PRE or
POST connection for the effector and adjust the SEND, RETURN
level control.
Digitally controlled fader components that are robust and
functional
•A C. FADER CURVE switch has been added to the cross fader to
provide 3 new types of cross fader curve settings.
•A reverse switch has been added for each channel fader and the
cross fader.
•Through the use of an engineered VCA control, volume can be
controlled with very little loss in audio quality using the channel
fader or cross fader.
•Reliability improvements have been made to the cross fader through
the adoption of optical cross fader circuits and a highly durable 45
mm stroke fader providing smooth operation.
Providing new audio performance using the channel
fader and cross fader
Use the channel fader to control the left (L) and right (R) channels
individually
•With the PLAY MODE function the selected channels can be
separated and the L or R volume can be controlled individually
using the channel fader.
Control the FRONT and REAR output for two channel output using
master 1, 2
•By turning the SEPARATE OUT switch to on, you can separate
CH1 and CH2 output to the front and CH3 and CH4 output to the
rear, providing you with new sound field performance in combination
with the feature of being able to adjust the left (L) and right (R)
channels individually.
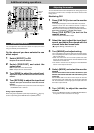
Linked play on the connected digital turntable
Real-time start and stop control using the fader
•You start and stop the digital turntable by operating the channel
fader or cross fader when connected to a digital turntable with a
control cable.
•A maximum of 2 digital turntables can be linked digitally through 2
digital inputs.