


RQT7230
15
Maintenance
To clean this unit, wipe with a soft, dry cloth.
•Never use alcohol, paint thinner, or benzine to clean this unit.
•Before using chemically treated cloth, read the instructions that came with the cloth carefully.
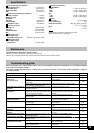
Troubleshooting guide
Before requesting service, make the below checks. If you are in doubt about some of the check points, or if the remedies indicated
in the chart do not solve the problem,
refer to the “Customer Services Directory” on back cover if you reside in the U.S.A., or refer to the “Product information” on page 4 if
you reside in Canada.
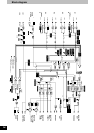
Equalizer characteristics
CD/LINE/PHONO
LOW +12 dB, –24 dB (50 Hz)
MID +12 dB, –24 dB (1 kHz)
HIGH +12 dB, –24 dB (10 kHz)
MIC
LOW +12 dB, –24 dB (100 Hz)
HIGH +12 dB, –24 dB (10 kHz)
General
Power supply AC 120 V, 60 Hz
Power consumption 35 W
Dimensions (WxHxD) 300 mm x 103 mm x 330 mm
(11
26
/32˝ X 4
1
/16˝ X 13˝)
Mass 5.3 kg
(11.7 lb.)
Note
Specifications are subject to change without notice.
Mass and dimensions are approximate.
Specifications
Input sensitivity/input impedance
PHONO (TRIM center) 2.5 mV/47 kΩ
LINE (TRIM center) 250 mV/10 kΩ
EFFECT RETURN 250 mV/47 kΩ
MIC 0.7 mV/1 kΩ
Rated output voltage/Output impedance
MASTER 1, 2 (RCA) 1 V/600 Ω
MASTER 1 (XLR) 1 V/600 Ω
MONITOR 1 V/1 kΩ
REC OUT 250 mV/1 kΩ
EFFECT SEND 250 mV/1 kΩ
Headphone output 30 mW/32 Ω
Frequency response
MASTER 1, 2 20 Hz to 20 kHz
REC OUT 20 Hz to 20 kHz
EFFECT RETURN 20 Hz to 20 kHz
MIC 20 Hz to 20 kHz
Digital audio input
Coaxial digital input
Compatible sampling rate 48 kHz/44.1 kHz/32 kHz (PCM)
Digital audio output
Coaxial digital output
Sampling rate 44.1 kHz (PCM)
Page Reference
8
9
7 - 8
9 - 10
7 - 8
—
8
10
9, 11
9
11
11
10
9
13
8
12
Action
Connect the power plug securely.
Check the source and set the control to the
proper position.
Connect the units properly.
Adjust the volume level controls correctly.
Connect the channels correctly.
Place the fluorescent light, other appliances or
their power cables as far away from the unit as
possible.
Connect the grounding wire securely.
Replace with a new fader.
Contact your nearest dealer.
Adjust the MASTER LEVEL or MONITOR LEVEL
control knobs.
Reduce the level by turning the TRIM control
knob.
Reduce the external effector's output level by
adjusting the SEND or RETURN control knob.
Turn the EFFECT switch ON for the channel to
be used.
Turn switch to the NORMAL position.
Select the input source assigned to , .
Turn ON the FADER START switch for the
channel to be used.
Use a control cable to connect the digital turntable
to the mixer.
Switch the SEPARATE OUT switch to ON.
Check
Has the power plug been disconnected?
Has the input switch been set to another
source?
Have any of the units been wrongly
connected?
Is the master level control or other volume
level controls at the MIN position?
Have you connected with the left and right
terminals reversed?
Is there a fluorescent light or other electrical
appliances, or are their power cables near
any of the connecting cables?
Has the turntable’s grounding wire been
disconnected?
Is one of the faders worn out?
Is the master volume level or monitor volume
level too high?
Is the input level too high?
Is the input level from the external effector
too high?
Is the EFFECT switch OFF?
Is the fader operation switch in the
REVERSE position?
Are the ASSIGN A and ASSIGN B switch
settings wrong?
Is the FADER START switch OFF?
Are the digital turntable and mixer connected
using a control cable?
Is the SEPARATE OUT switch OFF?
Problem
No power.
No sound even when the
power is on.
The volume is low.
Left and right sound is
reversed.
Low hum or buzz is heard
during play.
Fader (control slider) does
not move smoothly.
Sound is distorted.
External effector's sound is
distorted.
Effect does not appear to be
working.
Fader operation is reversed.
Cannot use the cross fader.
Cannot start the digital
turntable with the fader.
Output is not separated.