


23
RQT6945
Disc operations
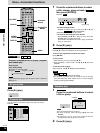
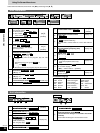
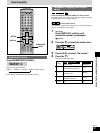
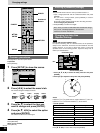
Display menu
Normal
0 0 OFF
0
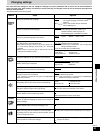
Picture menu
N 480P Auto1
q
w
3
4:3 Aspect
Select how to show images made for 4:3 aspect
screens on a 16:9 aspect television.
¡Normal: laterally stretches images made for a
4:3 screen.
¡Auto: expands suitable 4:3 letterbox images to fill
more of the screen. Other images appear in full
in the center of the screen.
¡Shrink: images appear in the center of the screen.
¡Zoom: expands all images to fill the screen.
If your television has a similar feature, use it instead for
a better effect.
VCDDVD-VDVD-ARAM
Zoom (\ page 18)
VCDDVD-VDVD-ARAM
VCDDVD-VDVD-ARAM
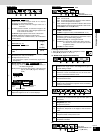
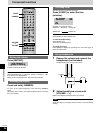
Subtitle position/Subtitle brightness
¡Position (0 to –60): in 2 unit steps
¡Brightness (Auto
∗
/0 to –9)
∗
The brightness adjusts automatically against the
background.
DVD-VDVD-A
4
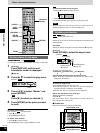
Bitrate display on/off
During play: shows the bitrate (approximate values) of
the video being played
While paused: shows the data volume of the frame and
type of picture (\ page 34, Glossary—
I/P/B)
VCDDVD-VDVD-ARAM
5
OSD brightness (–3 to +3)
Adjust the brightness of the on-screen displays.
[ENTER]
[w
, q]
[ENTER]
//
[e, r]
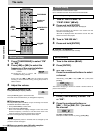
Making fine adjustments to the zoom
ratio
9.438 Mbps
Bitrate
Cur. 7.507 Mbps
Ave. 6.730 Mbps
5.0
Mbps
,/
[w, q]
Current
bitrate
Average bitrate
A record of bitrates for
a sampling period.
Only when
“PROGRESSIVE” is on
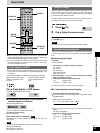
q
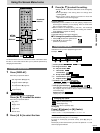
Picture mode
¡N: Normal mode
¡S: Soft mode (Soft picture with fewer video artifacts)
¡F: Fine mode (Details are sharper)
¡C1:
Mellows images and enhances detail in dark scenes
¡C2:
Sharpens images and enhances detail in dark scenes
¡U1/U2/U3: User mode (\ below)
w
Video output mode
¡480I: Interlace video
¡480P: Progressive video (“PROGRESSIVE” is on)
e
Transfer mode
Select the method of conversion for progressive output
to suit the type of material being played.
¡Auto1 (normal): for viewing film material
¡Auto2: for viewing film material (the same as Auto 1,
but able to convert 30-frame-per-second
progressive video)
¡Video: for video material
To change the user mode
1
Select User mode and press [q] to highlight the number.
2 Press [e, r] to select “1”, “2” or “3”.
U1: MPEG D.N.R. (Digital Noise Reduction)
U 1
U 1 0 0
0
0
r
Depth Enhancer (0 to +4)
Reduces the rough noise in the background to give a
greater feeling of depth.
t
3D-NR (0 to +4)/Dot NR (On)
Reduces overall noise/Reduces the dot noise that
occurs at the borders between colors.
y
Block NR (0 to +3)
Smoothes block noise.
u
Mosquito NR (0 to +3)
Reduces the smudging that appears around contrasting
sections of the picture.
i
Contrast (–7 to +7)
Increases the contrast between light and dark parts of
the picture.
o
Brightness (0 to +15)
Brightens the picture.
!0
Sharpness (–7 to +7)
Adjusts the sharpness of the edges of the horizontal
lines.
!1
Color (–7 to +7)
Adjust the shade of the picture’s color.
!2
Gamma (0 to +5)
Emphasis of outlines.
U3
U2
U 3 480P Auto1
Only when
“PROGRESSIVE” is on
1-3 (\ above)
0U 2 00
0 0