


Operations
21
RQT7953
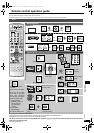
Other functions
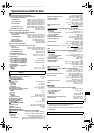
INPUT SELECTOR
2
2
TUNE
MENU
%DIGITAL
%PL
H. BASS
DOWN
VOLUME
PHONES
UP
INPUT MODE
MUSIC
AV/MOVIE
SFC
EFFECT
TONE/
BALANCE
ENTER
TOP MENU
SUB MENU/
PLAY LIST
SUBWOOFER
RETURN
MUTING
%PL
TV VOL TV VOL
/L /R
OFF
-
LEVEL/
-
TEST
-
H.BASS/
-
C.FOCUS
REC MODE
REC
DVD REC
TV
TV/AV
INPUT SELECTOR
2
2
TUNE
MENU
INPUT MODE
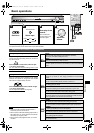
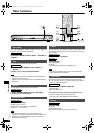
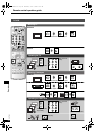
Turn the A/D attenuator on if “OVERFLOW” lights frequently
when using 2-channel analogue input.
Main unit
1.Press [TUNE 2 and 1] at the same time to enter the
setup mode.
2.Press [INPUT SELECTOR] to select “A/D ATT”.
3.Press [TUNE 2 or 1] to select “ON” or “OFF”.
4.Press [TUNE 2 and
1] at the same time to exit the
setup mode.
Change this setting to listen to software recorded with Dolby
Digital at low volume (such as late at night) and maintain audio
clarity. It reduces the peak level in loud scenes without affecting
the sound field.
Main unit
1.Press [TUNE 2 and 1] at the same time to enter the
setup mode.
2.Press [INPUT SELECTOR] to select “DR COMP”.
3.Press [TUNE 2 or 1] to select “OFF”, “STANDARD”
or “MAX”.
4.Press [TUNE 2 and 1] at the same time to exit the
setup mode.
OFF:
The software is played with the original dynamic range (factory
setting).
STANDARD:
The level recommended by the producer of the software for
household viewing.
MAX:
The maximum allowable compression (recommended for night
viewing).
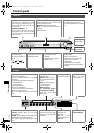
Dim the display for better viewing in a darkened room.
Main unit
1.Press [MENU] to select “DIMMER”.
2.Press [TUNE 2 or 1] to select “OFF” or “ON”.
3.Press [MENU].
A/D attenuator
Dynamic range compression
Dimmer
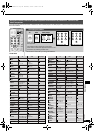
The SLEEP timer can turn the unit off after a set time.
It does not control any other components.
Main unit
1.Press [MENU] to select “SLEEP”.
2.Press [TUNE 2 or 1] to select the desired time.
The display changes as follows:
OFF
v SLEEP 30 v SLEEP 60 v SLEEP 90 v
SLEEP 120 (minutes)
3.Press [MENU].
The display dims even when the dimmer is “OFF”.
To check the setting
1. Press [MENU] to select “SLEEP”.
2. Press [TUNE 2 or 1] once. The time remaining appears.
3. Press [MENU].
To change a setting
Repeat the procedure from the beginning.
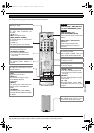
In rare cases, the unit may have trouble recognizing the digital
signals on discs.
• With the PCM signals on CDs, this may cause the beginning
of a track to be cut off. Engage the PCM FIX mode if this
occurs.
• With DTS, the signals may not be recognized at all. Engage
the DTS FIX mode if this occurs.
While the input source is selected:
Remote control
1.Press [INPUT MODE] to select “DIGITAL”
2.Press and hold [INPUT MODE] for four seconds.
The current mode is displayed. Press again to change the mode.
Each time you press the button:
AUTO → PCM FIX → DTS FIX
When a FIX mode is on, the unit cannot process other signals.
This may cause noise to be output. Select “AUTO” if this occurs.
The mode returns to AUTO when you switch the unit to standby.
For your reference
If you are playing a DTS CD that contains both DTS and PCM,
but it isn’t playing properly, then do the following after step 1
above:
On the Main unit
1. Press [MENU] to select “DTS-PCM”.
2. Press [TUNE 2 or 1] to select “ON”.
3. Press [MENU].
If this causes noise to occur, return the setting to “OFF”. (This
setting is effective for each digital source.)
Sleep timer
PCM/DTS fix mode
SC-HT17EB-EN.fm Page 21 Wednesday, March 9, 2005 10:57 AM