4
Outlaw Audio
Owner’s Manual
5
Model 200 M-Block Power Amplier
Owner’s Manual
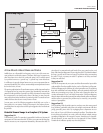
Speaker Wire Connections
IMPORTANT NOTE:
Do not make any change to this switch setting unless
the ac power cord is removed from the unit so that the amplier is totally
disconnected from any ac power source.
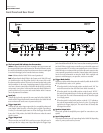
H
AC Power Switch
Turn this switch to the ON position to operate the Model 200.
I
Fuse
This fuse is used to protect the power supply only and is NOT part of the
speaker protection circuitry. If you suspect that the fuse has blown, rst
disconnect the Model 200 from the AC power source by removing the power
cord, and then connect the condition that lead to the blown fuse.
IMPORTANT NOTE:
The replacement fuse should have the proper rating
for the voltage setting in use and must be of the correct type. Consult the
data printed on the amplier’s rear panel for fuse information.
If the fuse blows repeatedly, discontinue use of the product and contact
Outlaw Audio Customer Service for further assistance.
J
AC Power Cord Receptacle
Connect the AC power cord supplied with the unit to this receptacle, and
connect the power cord plug to an AC outlet.
IMPORTANT NOTE:
A replacement power cord must be equal to the cord
supplied with the unit.
Installation and Conguration
SAFETY NOTE:
When making connections between any source compo-
nents such as AV Receiver, surround processors or multi-room controllers
and the Model 200, or when making any connections to speakers, be
certain that both the source device and the Model 200 are turned off. To
ensure that there will be no unwanted signal transients that can dam-
age equipment or speakers, it is always best to unplug all equipment
before making any connections. Modern electronic products often have
a “standby” mode that may be activated even though they product may
appear to be tuned off.
Power Control Connections
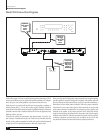
The Model 200 features a built-in remote turn on system that will automatically
turn on the amplier in one of two ways. Depending on your specic applica-
tion, the unit may also be turned on manually using the Rear Panel AC Power
Switch, or automatically via sensing of either an input source or a low voltage
trigger signal. For manual operation, no special installation is required. For
automatic turn-on, follow the instructions below for the chosen method.
Remote Turn-On From An External Device
Using The Low Voltage Trigger
To congure the Model 200 so that it turns on automatically in response to a
low voltage trigger signal, follow these steps:
1. Place the Trigger Power Control Mode Switch
E
in the far right position,
so that the switch is under the words “12 VOLT.”
2. To trigger the amplier from a device such as a surround processor, AV
Receiver or multi-room controller with a built-in trigger jack, connect one
end of a cable with a 3.5mm mono mini plug to the Trigger Jack
C
on the
Model 200. Connect the other end to a matching jack on the device that
will be provide a 6 to 35 volt signal when the unit is to be turned on.
3. If the source controller does not have a trigger jack, you may use the
music sense option to automatically turn on the Model 200, however, you
may also use the trigger switch if the source controller has a switched AC
Accessory outlet. If that is the conguration you wish to use, purchase a
small AC to DC power converter, as typically used to replace the batteries
in portable electronics devices. Select a model that is capable of delivering
6 to 35 volts DC, and make certain that one of the “tips” provided with
the unit is a 3.5mm mini-plug. Plug the transformer end of the converter
into the switched AC output on the source product, and connect the 3.5mm
mini-plug to the Trigger Jack
C
.
4. Press the Power Switch
H
in so that it is engaged, and note that the Standby
Indicator
A
will light for the channel pairs selected for trigger control
operation.
When the source control unit providing the power is turned on, the Model 200
will automatically turn on. When the source unit is turned off, the Model 200
will return to the standby mode.
Remote Turn-On Using Music Sense
To congure the Model 200 so that it will automatically turn on when the
amplier is receiving an audio signal, follow these steps:
Connect the audio input as normal to the Input Jack
B
.
Turn the Trigger Mode Switch
E
so that it is in the center position under
the word “Music.”
Make sure the AC Power Switch
H
is turned on. Note that the front panel
LED will turn amber indicating that the unit is in the Standby mode,
awaiting a signal that will activate the operational mode.
In this conguration, the Model 200 will automatically turn on whenever it
is receiving an audio input signal. The unit will return to the standby mode a
few minutes after the audio signal stops.
Speaker Wire Connections
It is always best to connect the amplier to your speakers using high quality
cable. The Model 200 is equipped with ve-way binding post terminals that
accept bare wire, spade lugs or banana type plugs when they are permitted
by local safety agencies. Once you have located the proper speaker terminals
for the type of output conguration in use, connect your speakers using the
following guidelines.
To assure that the high quality signals produced by your Model 200 are car-
ried to your speakers without loss of clarity or resolution, we recommend that
you use high quality speaker cable. Many brands of cables are available, your
choice may be inuenced by a number of factors; i.e.: the distance between
your speakers and the amplier; the type of speakers you use; personal prefer-
ences; and other factors.
Regardless of the brand or type of cable selected, we recommend using a cable
constructed of ne, multi-strand copper with a gauge of 14 or larger. Remember,
that in specifying cable, the lower the number, the thicker the cable.


