


everything is connected correctly, make sure the connections are correctly
marked or identified. Then follow the instructions in "Mounting the CD
Changer and Its Components."
MOUNTING THE CD CHANGER AND ITS COMPONENTS
Before you mount the CD changer and its components, be sure it is connected
correctly. Then disconnect the cable from the vehicle battery's negative
(-) terminal.
Mounting the CD Changer
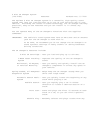
1. Set H/45/V on both sides of the CD changer for the mounting axis you
chose.
H/45/V is preset to H (horizontal). If you are mounting the CD changer
horizontally, leave H/45/V as it is and continue with Step 2.
If you are mounting the CD changer at a 45-degree angle, use a small
Phillips screwdriver to remove the screw from H, use the supplied tool
to turn H/45/V to 45 (45-degree angle), then replace the screw into 45
on both sides of the CD changer.
If you are mounting the CD changer vertically, use a small Phillips
screwdriver to remove the screw from H, use the supplied tool to turn
H/45/V to V (vertical), then replace the screw into V on both sides of
the CD changer.
CAUTION: If you do not set H/45/V on both sides of the CD changer to
the correct mounting axis, the CD changer might skip during
play.
HINT: Save the tool in case you ever want to install the CD changer in
another vehicle or change the mounting location. You can secure
it to the back of the CD changer with a piece of tape.
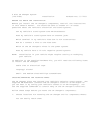
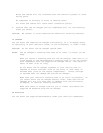
2. Use a medium-sized Phillips screwdriver to attach the supplied
mounting brackets to the sides of the CD changer.
If you are mounting the CD changer horizontally, attach both mounting
brackets to the CD changer.
If you are mounting the CD changer at a 45-degree angle, attach both
mounting brackets to the CD changer.
If you are mounting the CD changer vertically, attach both mounting