


5
Step 1:
Connections
2
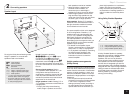
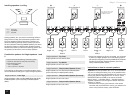
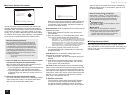
Connecting speakers
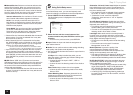
Speaker layout
"
$
%
&
'
7
8
9
G
H
I
J
F
#
To enjoy the Dolby Atmos listening mode,
Height 1 speakers or surround back
speakers need to be installed.
"#
Front speakers
$
Center speaker
%&
Surround speakers
'
Subwoofer
7 8
Surround back speakers
9 F
Height 1 speakers (Front High)
G H
Height 2 speakers (Rear High)
I J
Wide speakers
r
GH
and
IJ
share the same speaker
terminals. Select either of the groups.
r To use the multi-zone function, see the
section 6 "Using the multi-zone function"
of "Step 3: Playing Back".
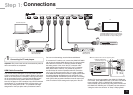
5.1 ch: Connect the speakers
"#$%&'
to the unit.
"#
output
front stereo sound.
$
outputs center
sounds such as dialogs and vocals.
%&
create back sound field.
'
reproduces
bass sounds and creates rich sound field.
Up to four subwoofers can be connected to
the unit.
Surround back speakers: Placing
78
URGCMGTUCNNQYURNC[DCEMKP|EJ
configuration that improves sense of
envelopment created by back sound field.
It also improves seamlessness of back
sounds and provides more natural sound
experiences in the sound field.
Height speakers 1 and 2: Placing
9F
or
GH
speakers produce surround effects on
a height plane.
r To enjoy the Dolby Atmos listening
mode, Height 1 speakers or surround
back speakers need to be installed.
r Although Height 1 speakers can
enhance surround effects, we
recommend you to add Height 2
speakers in order to ensure full effects.
r Install Height speakers such as Front
High and Rear High speakers on the
upper part of the front or rear wall. There
are other types of Height speakers.
Wide speakers: Placing
IJ
speakers
makes the front sound field even wider. It
also give smoother transitions between
front and back surround sounds.
The power amplifier of this unit is designed
for 9 ch configuration. Therefore,
78
speakers cannot be used together with
GH
(or
IJ
) speakers during playback.
When both groups are connected, you
can switch speakers to be used on the
Quick Setup menu that appears when you
press Q SETUP on the remote controller
(Speaker Layout function).
r For details on the Speaker Layout
function, see the section 5 "Using Quick
Setup menu" of "Step 3: Playing Back".
r 11 ch playback is possible by connecting
an external power amplifier to this
unit. See the Advanced Manual for
information on how to connect the
external amplifier.
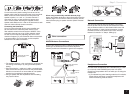
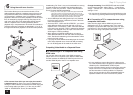
Height speakers arrangements
(Dolby Atmos)
There are several types of Height speakers
other than those mentioned in the previous
section. See the next section "Combination
patterns of Height speakers 1 and 2" and
select the combination pattern from those
specified for Height speakers 1 and Height
speakers 2.
r
This unit performs optimal sound field
processing for the type of Height speakers
1 and 2 which is registered in initial
settings (with setup wizard) according to
an actual speaker layout. Note that the
optimal effect cannot be achieved if you
place Height speakers in a combination
pattern other than those specified.
r
Dolby recommends to place the speakers
as described on “Installing speakers in
ceiling” to obtain the best Dolby Atmos
effect.
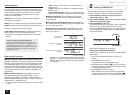
Using Dolby Enabled Speakers
ab
ef
cd
a b
Dolby Enabled Speaker (Front)
c d
Dolby Enabled Speaker (Surround)
e f
Dolby Enabled Speaker (Back)
A Dolby Enabled Speaker is specially
designed to be used as a Height speaker.
There two types of Dolby Enabled
Speakers, the one is to be placed on
the top board of other speakers such as
front speakers and surround speakers,
and the other is integrated type with the
normal speakers. Dolby Enabled Speakers
designed with their output facing toward the
ceiling to create an elevated audio effect
in the Dolby Atmos and Dolby Surround
listening modes by providing sounds
echoing off the ceiling.