


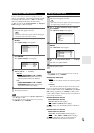

74
En
There are two ways you can connect Zone 3 speakers:
1. Connect them directly to the AV receiver.
2. Connect them to an amp in Zone 3.
Connecting Your Zone 3 Speakers Directly
to the AV receiver
This setup allows 7.1-channel playback in your main room
and 2-channel stereo playback in Zone 3, with a different
source in each room. This is called Powered Zone 3, as the
Zone 3 speakers are powered by the AV receiver. Note that
when Powered Zone 3 is turned off, you can enjoy 9.1-
channel playback in your main room.
Note
• With this setup, the Zone 3 volume is controlled by the AV
receiver.
Connecting Your Zone 3 Speakers to an
Amp in Zone 3
This setup allows 9.1-channel playback in your main lis-
tening room and 2-channel stereo playback in Zone 3,
with a different source in each room.
Note
• With the default settings, the Zone 3 volume must be set on the
Zone 3 amp. If your Zone 3 amp has no volume control, set the
“Zone3 Out” setting to “Variable” so that you can set the
Zone 3 volume on the AV receiver (➔ 75).
Zone 3 12V Trigger
When Zone 3 is turned on, the output from the ZONE 3
12V TRIGGER OUT goes high (+12 volts, 25 milliam-
peres max). Connecting this jack to a 12-volt trigger input
on a component in Zone 3 will make that component turn
on or off as and when Zone 3 is turned on or off on the AV
receiver.
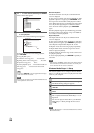
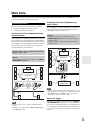
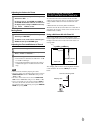
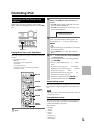
Connecting Zone 3
To use this setup, you must set the “Powered Zone3”
setting to “Act” (➔ 75).
Hookup
• Connect your Zone 3 speakers to the AV receiver’s FRONT
HIGH/ZONE 3 L/R terminals.
R L
Main room
Zone 3
TV
AV receiver
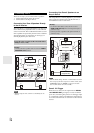
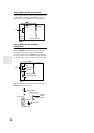
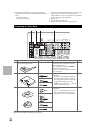
Hookup
• Use an RCA audio cable to connect the AV receiver’s
ZONE 3 PRE OUT L/R jacks to an analog audio input on
your Zone 3 amp.
• Connect your Zone 3 speakers to the speaker terminals on
your Zone 3 amp.
R
L
IN
Main room
TV
Zone 3
AV receiver
Receiver/
integrated amp