


Operation
There are two ways to use the SS-4/SS-6. You may play one
pair of speakers at a time, or play multiple pairs simultaneously.
If you intend to play more than one pair of speakers at the
same time, you will need to become familiar with the opera-
tion of the SS-4/SS-6’s Protection button.
9
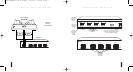
S
PEAKER
S
ELECTION
S
YSTEM
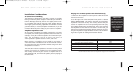
AMPLIFIER SPEAKER 4 SPEAKER 3 SPEAKER 2 SPEAKER 1
Niles Audio Corporation Miami, Florida USA
TUNER 94.9
15
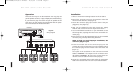
Niles SS-4
Receiver
Speaker
Pair 4
Speaker
Pair 3
Speaker
Pair 2
Speaker
Pair 1
Figure2
Wiring Diagram
Installation
1. Select a convenient mounting location for the SS-4/SS-6.
2. Run all the necessary wiring to the SS-4/SS-6. Label the
wires for future reference. See (Figure 2).
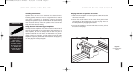
3. Locate the connector plugs (and remove them if they are
plugged in). See (Figure 2).
4. Strip 1/4" of insulation from the end of each wire. Tightly
twist the end of each wire until no frayed ends remain.
5. Use a small flathead screwdriver or your thumbnail to raise
the locking tabs, exposing the holes on the removable con-
nector plug.
6. Insert each wire into the appropriate hole on the removable
connector plug, and snap the locking tab down.
NOTE: To help you avoid improper installation, the
connector plug is keyed.
7. Insert the smooth side of the connector plug into the
smooth side of the socket. Don’t force the scalloped side of
the connector plug into the smooth side of the socket. See
(Figure 3).
The inputs of the SS-4/SS-6 are the connector terminals
labeled “AMPLIFIER”. The outputs are the connector termi-
nals labeled “SPEAKERS”. Be sure not to reverse these con-
nections or the SS-4/SS-6 will not function properly.
8. Locate the pre-printed Room Labels. Affix the appropriate
label to the recessed area over each on/off selector button.
6
S
PEAKER
S
ELECTION
S
YSTEM
DS00359ACN/SS-4/SS-6 Printer 11/19/03 5:09 PM Page 9