


5
INSTALLATION
To ensure years of enjoyment from your NADY AUDIO SPM-835 powered mixer console, please read and understand this
manual thoroughly before using the unit.
1. INSPECTION
Your NADY AUDIO SPM-835 was carefully packed at the factory in packaging designed to protect the units in shipment.
Before installing and using your unit, carefully examine the packaging and all contents for any signs of physical damage
that may have occurred in transit.
(Note: Nady Systems is not responsible for shipping damage. If the unit is damaged, do not return to us, but notify your
dealer and the shipping company immediately to make a claim. Such claims must be made by the consignee in a timely
manner.)
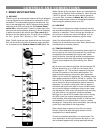
2. SETUP AND OPERATION
Parts of the unit can become very warm during use. This is normal during operation. Care should be taken to ensure that
there is enough space around the unit for cooling (at least 12” or 30cm). Do not place the SPM-835 on high temperature
devices such as power amplifiers etc. or the unit may overheat in operation. Also do not place the unit on speakers as this
may cause them over a long time to move and fall due to speaker vibrations.
Although the unit’s chassis is shielded against radio frequency (RF) and electromagnetic interference (EMI), extremely
high fields of RF and EMI should be avoided.
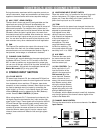
When ready to operate, connect the AC cord to the IEC receptacle and plug into the power source. Be sure to confirm the
voltage is proper (115 or 230VAC) for the unit as noted under the AC cord receptacle on the back of the unit. Also make
sure that the unit is turned off before connecting to the AC power source. This will avoid possible loud transients which can
damage your speakers or your ears, especially when monitoring with headphones.
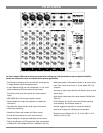
Set the noted controls to the positions stated below to further minimize the chance of such undesired noises when first
powering up your SPM-835 :
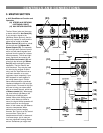
LEVEL CONTROLS (7,17) ............................................................................TURN COUNTERCLOCKWISE COMPLETELY
HI, MID & LOW (4) ..........................................................................................................TURN TO THE CENTER POSITION
MASTER & PHONES CONTROLS (17,22) ..................................................TURN COUNTERCLOCKWISE COMPLETELY
PAN/BAL CONTROLS (6,11) ..........................................................................................TURN TO THE CENTER POSITION
ALL OTHER CONTROLS SHOULD ALSO BE TURNED COUNTERCLOCKWISE COMPLETELY
Power up the unit as noted in Power Connection and Switches (3d in the Control and Connections section).