


6
Nady Systems Inc. – PSS-300 Portable Sound System
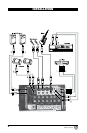
Speakers and Stands
If using the optional SPST-1A, fully extend the speaker stand tripod legs and tighten
the base screw. Extend the pole of the stand to the desired height and insert the safety
pin completely through the stand hole above the pole thumbscrew. Lower the pole so
that the pin rests on the holder and tighten the pole thumbscrew. Attach the included
speaker stands to the bottom of the speakers and tighten with included bolts until
completely secure.
Setup the stands on a flat surface where the speakers will be located and not disturbed.
Place the speakers on the stands and position them as desired, and tighten the included
bolt on the speaker mount until secured to the pole. Note: facing the speakers towards any
of the microphones connected with the PSS-300 will increase the chance of feedback.
Connect the speaker cables to the input jacks on the lower left front panel of both the Left
and Right speakers. Connect the other end of each cable to the corresponding Left and
Right speaker outputs on the rear panel of the PSS-300 mixer section. Position the length
of the cables so they will not be a safety hazard to people.
WARNING: Connect only the supplied speakers to the PSS-300. Never connect additional
passive speakers to the PSS-300.
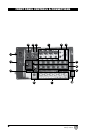
Inputs
Connect all sound sources to the appropriate inputs i.e., microphones, keyboards,
CD players, karaoke machines.
When ready to operate, plug the AC cord into the power source. Make sure that the unit
is turned off before connecting to the AC power source to avoid possible loud transients,
which can damage your speakers or your ears. Before turning on, connect up the speakers
and all inputs and outputs desired and turn down the Master Volume.
INSTALLATION