


QUICK START
1. Connect the speakers to the Speaker A terminals and pre-
amplifier to the “FIXED IN” inputs.
2. Plug in the AC power cord.
3. Press the POWER button to turn the NAD C270 on.
4. Press the required input selector.
NOTES ON INSTALLATION
Your NAD C270 should be placed on a firm, level surface. Avoid
placing the unit in direct sunlight or near sources of heat and
damp. Allow adequate ventilation. Do not place the unit on a soft
surface like a carpet. Do not place it in an enclosed position, such
a bookcase or cabinet, that may impede the airflow through the
ventilation slots. Make sure the unit is switched off before making
any connections.
The RCA sockets on your NAD C270 are colour coded for
convenience. Red and white are Right and Left audio respectively.
Use high quality leads and sockets for optimum performance and
reliability. Ensure that leads and sockets are not damaged in any
way and all sockets are firmly pushed home.
For best performance, use quality speaker leads of 16 gauge
(1.5mm) thickness or more. If the unit is not going to be used for
some time, disconnect the plug from the AC socket.
Should water get into your NAD C270, shut off the power to the
unit and remove the plug from the AC socket. Have the unit
inspected by a qualified service technician before attempting to
use it again. DO NOT REMOVE THE COVER, THERE ARE NO
USER-SERVICEABLE PARTS INSIDE.
Use a dry soft cloth to clean the unit. If necessary, lightly dampen
the cloth with soapy water. Do not use solutions containing benzol
or other volatile agents.
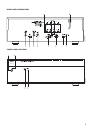
REAR PANEL CONNECTIONS (FIGURE 1)
1. FIXED IN
The Fixed Inputs take the input signal straight to the power
amplifier’s circuitry. This set of inputs is normally used in a system
with only one power amplifier or multiple but identical power
amplifiers. Refer also to section “Variable In” in this chapter for
more information.
Connect the output from a pre-amplifier or processor, such as a
surround-sound decoder, to this set of inputs. Use a twin RCA-to-
RCA lead to connect to the left and right ‘Audio Output’ of the pre-
amp or processor to the Fixed-In sockets.
NOTES: Always turn the C270 and other components in the
system off before connecting or It is disconnecting anything to the
“Fixed In” or Variable In” sockets.
When using the Fixed In sockets, make sure the “Input Select”
switch (No.2) is to the “Fix” position.
2. INPUT SELECT
The Input Select switch determines which input on the C270 is
active. Set to “FIX” for use with “Fixed In” and to “VAR” for use
with “Variable In”. Refer also to section “Variable In” in this
chapter for more information.
3. VARIABLE IN
Using the Variable inputs, it is possible to adjust the volume level
for both channels simultaneously, using the Input Level Control
(No. 4). This can be useful for:
• Level matching
In a surround sound or system with more than one set of
speakers, differences in levels can occur due to variances in
efficiency between these speakers. In case your preamplifier or
processor also has individual trims for each channel, set these
to neutral or mid position (usually marked as 0dB). Adjust the
Level Control so that the speakers driven by the C270 have the
correct volume level compared to the other speakers, judging
from your listening position.
• Extended volume control range
Many systems have so much voltage gain that the speakers (or
your ears) are overdriven at any volume control setting higher
than 11 or 12 o’clock. As a result you are confined to using only
the lower half of the volume control’s range, where adjustments
are imprecise and where channel balance errors tend to be
greater. If the input level is reduced, you can turn up your
processor’s or preamplifier’s volume control, making more
effective use of its range. (Suggestion: adjust the input level
controls so that your preferred maximum sound levels usually
occur at about 2 or 3 o’clock on the volume control.) As an
added benefit, this procedure suppresses any noise produced
by the preamp’s high level circuitry (e.g. any residual hum or
hiss that does not go away when the Volume is turned down).
• Bi-Amping
Some loudspeakers have separate connection terminals for the
LF (Low Frequency) and HF (High Frequency) sections of the
speaker. This facility allows to “Bi-Amp” such speakers, where
a separate power amplifier is used for the LF and HF section,
which may improve overall sound quality. When Bi-Amping with
different models of power amplifiers, it is likely to occur that one
power amplifier has more “gain” than the other, resulting in a
mis-match in level for the woofer and tweeter of the speaker.
Adjust the level control so that woofer and tweeter are in perfect
balance with each other (identical gain of power amplifiers).
Connect the output from a pre-amplifier or processor, such as a
surround-sound decoder, to this set of inputs. Use a twin RCA-to-
RCA lead to connect to the left and right ‘Audio Output’ of the pre-
amp or processor to the Fixed-In sockets.
NOTES: Always turn the C270 and other components in the
system off before connecting or disconnecting anything to the
“Fixed In” or Variable In” sockets.
When using the “Variable In” sockets, make sure the “input
Select” switch (No.2) is to the “VAR” position.
4. INPUT LEVEL CONTROL
The Input Level control works in combination with “Variable In”
(No. 3) only. With the control the volume to the power amplifier
can be adjusted from zero (counter clock-wise) to maximum
(turned up all the way clock-wise). Refer also to section “Variable
In” in this chapter for more information.
NOTE: Always turn the C270 and other components in the system
off before connecting or disconnecting anything to the “Fixed In”
or Variable In” sockets.
GB
4
NAD C270 Stereo Power Amplifier