


10
Mr. Heater | Gas-Fired Low-Intensity Infrared Heater Operating Instructions and Owner’s Manual
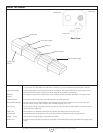
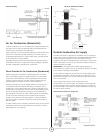
Hang the Heater
Residential garages come in a variety of sizes, shapes, styles and
methods of construction. Because of all these variables, it is not
possible to include mounting hardware with the Mr. Heater MHT
heater. Although wooden rafters and joists are the most common
overhead structural members in residential garage applications, other
structural congurations are also illustrated below.
In the typical suspension methods shown below, lengths of chain
are shown as a means of lowering the heater. However, for most
residential applications it may not be necessary to lower the heater.
Instead, it may be possible to screw hook-type hardware into the
underside of a beam. The exposed hook could directly engage one
of the two mounting holes in the front xed hanger, while another
hook could engage in one of the three suspension loops of the rear
movable hanger.
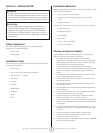
Whichever method of suspension is selected, the two required
suspension points must be capable of supporting a minimum
of 150 pounds each.
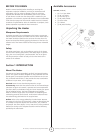
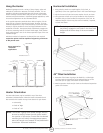
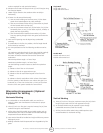
Heater Orientation
The MHT tube heater may be installed in any of the three
orientations indicated below. Select the heater orientation that is
best suited for the location that you have chosen for your heater.
• Horizontally
• Tilted 45° Right
• Tilted 45°° Left
NOTE: If the heater is going to be vented through the roof,
be sure to carefully review the roof option installa-
tion portion of this section. Ensure that the selected
mounting site will satisfy the measurement param-
eters (vent length not to exceed 25 feet) described in
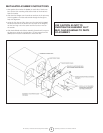
that section. Horizontal Installation
Horizontal Installation
1. Using S-hooks, attach two equal lengths of 2/0 chain, or
equivalent, to the two uppermost holes in the front xed hanger.
2. Slip the free end of both chains onto another S-hook, as shown.
3. The uppermost S-hook can now be installed on the suspension
hardware that you have installed for suspension of the unit. An
additional length of chain may also now be installed, if required,
to lower the heater.
NOTE: The hook portion of hook-type suspension hardware
may directly engage the two holes in the front xed
hanger and the center loop of the rear moveable
hanger.
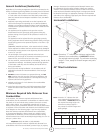
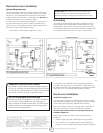
45° Tilted Installation
1. Determine if the heater is going to be tilted left, or tilted right.
The front and rear suspension points selected must be on the
same side (left or right) of the heater as shown below.
2. Attach suspension hooks and/or chains to the selected suspension
points of the heater.
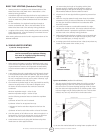
Wood Beam
Threaded Hook
Most common for
residential
applications
Locknut
Washer
Wood Beam
Washer
Screw Hook
min. 3/8" (10 mm)
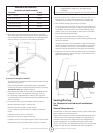
I-Beam
Beam Clamp
As Req'd
S-Hook
Bar Joist Clip
Truss
Concrete Beam
Anchor
Most common for non-residential applications
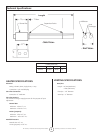
Front Fixed Hanger
Rear Movable Hanger
Use these two suspension
points for Tilted 45° Right
Installation
Tilted Right
Use these two suspension points for Tilted
45° Left Installation
Tilted Left