


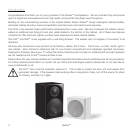


Fixing to the Wall
The R45
HD
comes with a bracket to mount it on the wall. It is fixed using the 2 button head screws on the back of
the cabinet either side of the terminals.
WARNING: Ensure that there are no water pipes, or electricity cables running behind where the wall bracket
is going to be secured. Work from secure steps and avoid trailing wires.
WARNING: Do not connect your speaker cable to the amplifier before connecting it to the speaker.
When you unpack the Radius Wall Bracket you will notice that it is packed in two parts. Please do not put these two
pieces together before fixing to the wall.
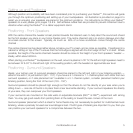
Remove the backing from the ‘low tack’ adhesive on the back of the template. Offer the bracket template up to 1.
the wall, so that the fixing holes run vertically, ensuring that it is true. If you are happy, press it against the wall
to hold it in place. Mark the centres of the two wall fixing holes with a bradawl, piercing through the template
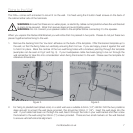
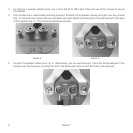
(examples can be seen in Fig.2 and Fig. 3). If your loudspeaker cable has been/going to be run through the
wall remember to take this into consideration when fixing the bracket to the wall. Please see the template for
reference dimensions.
For fixing to plasterboard (sheet-rock) or a solid wall use a suitable 6.5mm (1/4”) drill bit. Drill the two positions 2.
deep enough to accept the wall plugs provided, this should be 30mm (1 1/8”). Insert the wall plugs into the
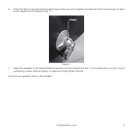
wall. If your cable has been run through the wall, feed it through the hole in your wall bracket and then screw
the bracket to the wall using the 25mm (1”) screws provided. There are two small markers on the wall bracket
to ensure vertical/horizontal alignment.
Figure 2.
Figure 3.
monitoraudio.co.uk 7