


12
10. SPEAKER CALIBRATION
1. Your speakers should now be in their final positions.
2. Remove all EQ and signal processing from the monitor path.
3. Turn all volume controls in the signal chain to their “reference level” position. These volume controls include the console
main monitor pot, submaster faders and power amplifier volume pots. The “reference level” position is your defined reference play-
back level, which is typically 85dB SPL for film, video and music. For the purposes of this discussion, we will assume that 85dB SPL
is your reference level. If you use a different reference level, then substitute the level that you use whenever you see 85dB SPL.
4. Transfer one channel only (left or right) of the M&K Professional test CD onto your audio storage medium (Pro Tools,
open reel recorder, etc.). It is important that the tones be played back from your source through the normal routing of your con-
sole or Pro Tools system so that the system calibration is conducted through the same signal path that your audio goes through.
5. Select track three on the test CD and use the 1kHz tone to level-set your console for 0VU on an analog console, or
–18 FSD if working digitally. Do not move the faders once you have level-set your monitor path.
6. Select track one on the test CD and route it to the speaker that you want to calibrate (for example: left front).
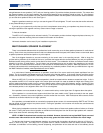
7. Set your SPL meter for C weighting (flat) and slow (average) response. Set the scale to 80dB. Hold the meter at about
a 45 degree angle to vertical and at arm’s length to avoid a false reading from sound bouncing off your body and into the micro-
phone. Point the meter at the center speaker at about ear height. Play track one of the test CD through the selected speaker
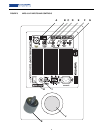
and read the SPL. Adjust the level to 85dB using a small screw driver on the trim pot on the selected channel of the LFE-4.
8. Do the same for all front (or main) speakers and point the meter at each speaker in turn. The meter’s microphone is directional.
9. Do the same for the surround speakers (Note: the film community prefers to use 82dB as the reference level for
surround speakers while DVD authors, broadcasters and music mixers prefer to set all their speakers, including the surrounds,
to the 85dB standard.)
(NOTE: if your speakers are moved, it is recommended that the whole system be re-calibrated.)
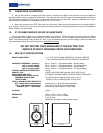
11. SUBWOOFER PLACEMENT
Perhaps the most challenging aspect of tuning a subwoofer/satellite monitor system is finding the best place to put the
subwoofer in the listening room. Each room exhibits unique characteristics and challenges because of the wide range of size,
shape, building materials and equipment in the room.
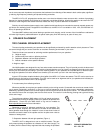
Generally speaking, it is not a good idea to place the subwoofer directly in the center between the left and right speakers.
There’s usually a null in this location which absorbs low frequencies rather than reinforcing them. Instead, try placing the
subwoofer near a wall or even in a corner of the control room. When properly set up, the low end will still sound tight and
phase-coherent with the satellites even though the subwoofer is placed off-center. This is because the wavelengths of low
frequencies are very long and are omni-directional.
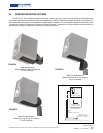
Remember that when you place the subwoofer near a wall the sound will couple with the wall and create an extra 3dB of
gain. Place the subwoofer in a corner and you will pick up additional 3dB of gain.
An effective way to find the best location for the subwoofer is to start out by placing the subwoofer at the listening position.
Connect an audio source to the input of the subwoofer and play music with good low-end content through the subwoofer. While
the music is playing, move around the room in areas that you think might be good locations for the subwoofer’s final placement.
Try to locate an area that responds well to the music being played by the subwoofer. Listen for even, well-defined, low fre-
quency response. Once you have settled on a possible placement, move the subwoofer to that location. Experiment with aim-
ing the subwoofer directly at the console, or aiming it at a wall or even aiming it along a wall. Once you have found a good
placement solution for the subwoofer, play program material that you are familiar with through the satellites and subwoofer and
check the sound quality. Two-channel material is good for this as the imagery of the phantom center depends upon equal vol-
ume from both channels and phase coherency of the satellites with the subwoofer.
Using the guidelines in this manual and with a little experimentation, it will be possible to find a solution for almost any room.