


10
Back Light Menu
This menu sets the automatic shutoff time for the MicroTrack 24/96’s back light. When set to “always off,” the back light will never turn on. When
“always on” is selected, the back light will be on whenever the MicroTrack 24/96 is powered on. The other three settings available on this menu
determine the amount of time the back light will stay on after the last control is pressed on the MicroTrack 24/96. For example, if “5 seconds” is
selected, the back light will turn on any time a button is pressed on the MicroTrack 24/96. The back light will then turn off five seconds after the
last button is pressed.
Using the back light will have an effect on the battery life of the MicroTrack 24/96. Using the back light often will drain the battery quickly. Therefore,
we recommend only using the back light when necessary in order to yield maximum battery life.
System Menu
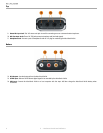
1. Connect to PC: Switches the MicroTrack 24/96 into host mode so that files on the CompactFlash media can be accessed by a computer.
2. Format Media: Used for formatting (erasing) the inserted CompactFlash media.
3. Link L+R: Locks the levels of the left and right inputs together.
4. Playback EQ: Allows you to select one of the preset EQ curves for file playback.
5. Scrub Audio: Allows you to hear audio as you rewind and fast-forward through a file during playback.
6. Verify Delete: Turns the Delete confirmation on and off.
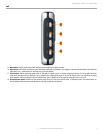
7. Auto Off: Displays options for conserving power.
8. Language: Lets you select a language for the MicroTrack 24/96 display.
9. Factory Defaults: Resets the MicroTrack 24/96 to its factory settings.
10. Firmware Update: Provides a method for updating the operating system within the MicroTrack 24/96 as new updates are released.
11. Version: Shows the current OS version.
12. Contrast: Allows adjustment of the display contrast for easy viewing.
13. Setup Time & Date: This allows you to set the proper time and date on the device.
<
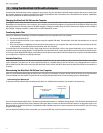
Connect to PC Menu
This menu option is used to connect your MicroTrack 24/96 to your computer when the USB cable is already attached.
1. Selecting this menu option will present you with a screen that says “press NAV key to connect to pc via usb.”
2. In order to connect, press in on the [NAV] wheel.
3. When the connection between the MicroTrack 24/96 and your computer is made, the MircoTrack will enter host mode so that files on
the media can be accessed by the computer. While in host mode, “M-Audio” will be shown on the screen along with a USB symbol and
the MicroTrack 24/96 will not be able to record or play back files.
4. To exit host mode, press the [DEL] key.
<
Format Media Menu
This menu allows you to format the inserted CompactFlash or Microdrive media. It is necessary to format your media before you can begin
recording. Be aware that formatting a medium will erase any data it contains. Because of this, formatting can be used as a quick way to
delete all files on the media.
1. When you first enter this menu option, the screen will read “Format media?”
2. Press in on the [NAV] wheel to continue.
3. You’ll then see a message that says “Are you sure?” This is your last chance to cancel the process if you do not want to format (press
[MENU] to exit). Otherwise, press in on the [NAV] wheel to start formatting.
4. During the formatting process, “Formatting” will be shown on the MicroTrack 24/96 display. Larger media will take longer to format than
smaller media.
5. “Media formatted” will be shown once the formatting process is finished.
<
Link L+R Menu
This is a simple on/off menu selection. When this option is set to on, the recording levels of inputs L and R will be matched. If you use
the [LEVEL] buttons to adjust the record level of one of the inputs, the other input will automatically be matched to the same level. This is
especially useful when making stereo recordings as this setting will preserve the stereo image. When this option is turned off, the input
levels of the channels will become independent again.
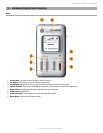
3 - Hardware Controls and Indicators