


Page 15
Stylos User's Manual
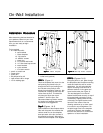
Mounting the StylosMounting the Stylos
Mounting the StylosMounting the Stylos
Mounting the Stylos
Remove the Stylos from the packing
bag, spread the bag on the floor and
lay the Stylos face down. If possible,
attach the speaker cable and A.C.
cord to the Stylos now, as the A.C.
receptacle and 5-way binding posts
are more accessible before mounting
to the wall.
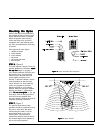
Parts required for each Stylos:
1 - additional human
2 - metal washers
2 - nylon washers
1 - cap screw
1 - cap screw with knob
1 - allen wrench
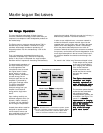
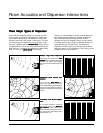
STEP 6 STEP 6
STEP 6 STEP 6
STEP 6
(Figure 6)
This step requires 2 people. Place the
speaker between the brackets,
attachattach
attachattach
attach
the top first.the top first.
the top first.the top first.
the top first.
Begin by placing a
nylon washer between the Stylos and
the bracket. Then, using the metal
washer and the bolt with the knob,
loosely attach the Stylos to the
bracket. To attach the bottom, use the
same procedure as above except
mount with the 1/2" allen head cap
screw, do not tighten at this time.
Adjust the Stylos for your listening
position. After fine tuning the speaker
position (see Step 7), tighten both
bolts.
Do not over-tighten.Do not over-tighten.
Do not over-tighten.Do not over-tighten.
Do not over-tighten. If the top
knob strips from the bolt, pop off the
knob and use the supplied allen
wrench to tighten. Replace the knob to
complete the design cosmetics.
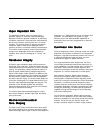
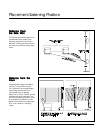
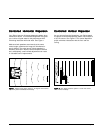
STEP 7STEP 7
STEP 7STEP 7
STEP 7
(Figure 7)
For optimum performance, both
speakers should be positioned so that
they mirror each other. We recom-
mend aiming the inside 1/3 of the
electrostatic panel to your main
listening area. Take the time to
measure the distance from the wall to
the outward edge of each speaker to
ensure mirrored placement.
Figure 6Figure 6
Figure 6Figure 6
Figure 6. Stylos Assembly Parts Sequence
Figure 7Figure 7
Figure 7Figure 7
Figure 7. Stylos Position